Compare Models
- 26 Apr 2024
- 17 Minutes to read
- Print
- DarkLight
- PDF
Compare Models
- Updated on 26 Apr 2024
- 17 Minutes to read
- Print
- DarkLight
- PDF
Article Summary
Share feedback
Thanks for sharing your feedback!
You can quickly and easily compare model performance across multiple datasets in a single project.
All trained models for a project now appear in a table on a new tab called Models. By default, you can see how each model performed on its Train, Dev, and Test sets. You can also add existing dataset snapshots—or filtered versions of them—to the table. This matrix empowers you to quickly compare model performance on a variety of datasets. From here, you can also deploy models.
Comparing model performance on the Models tab isn't a required step in LandingLens, but it's a useful technique for identifying your most accurate models.
.png) Compare Model Performance Across Different Datasets on the Models Page
Compare Model Performance Across Different Datasets on the Models PageNote:
Due to the unique nature of Visual Prompting, the Models tab is not available for Visual Prompting projects.
How do I use the Models table to see what model is the best for my project?
You can use the Models table to quickly evaluate model performance across different datasets. You can also see how the same model—but with different confidence scores—performs on the same datasets.
There is no one-size-fits-all solution, but quickly comparing model performance can help you identify 1) what model works best for your use case and 2) what models might need better images or labels.
Here are some considerations:
- If two models have the same confidence threshold but different scores on the same datasets, view the predictions for the model with the lower score. Are the labels correct? Do you need more images of a specific class?
- If a model has a higher score on a dataset that is most like your real-world scenario, that model might be the best one for your use case.
Models Table Overview
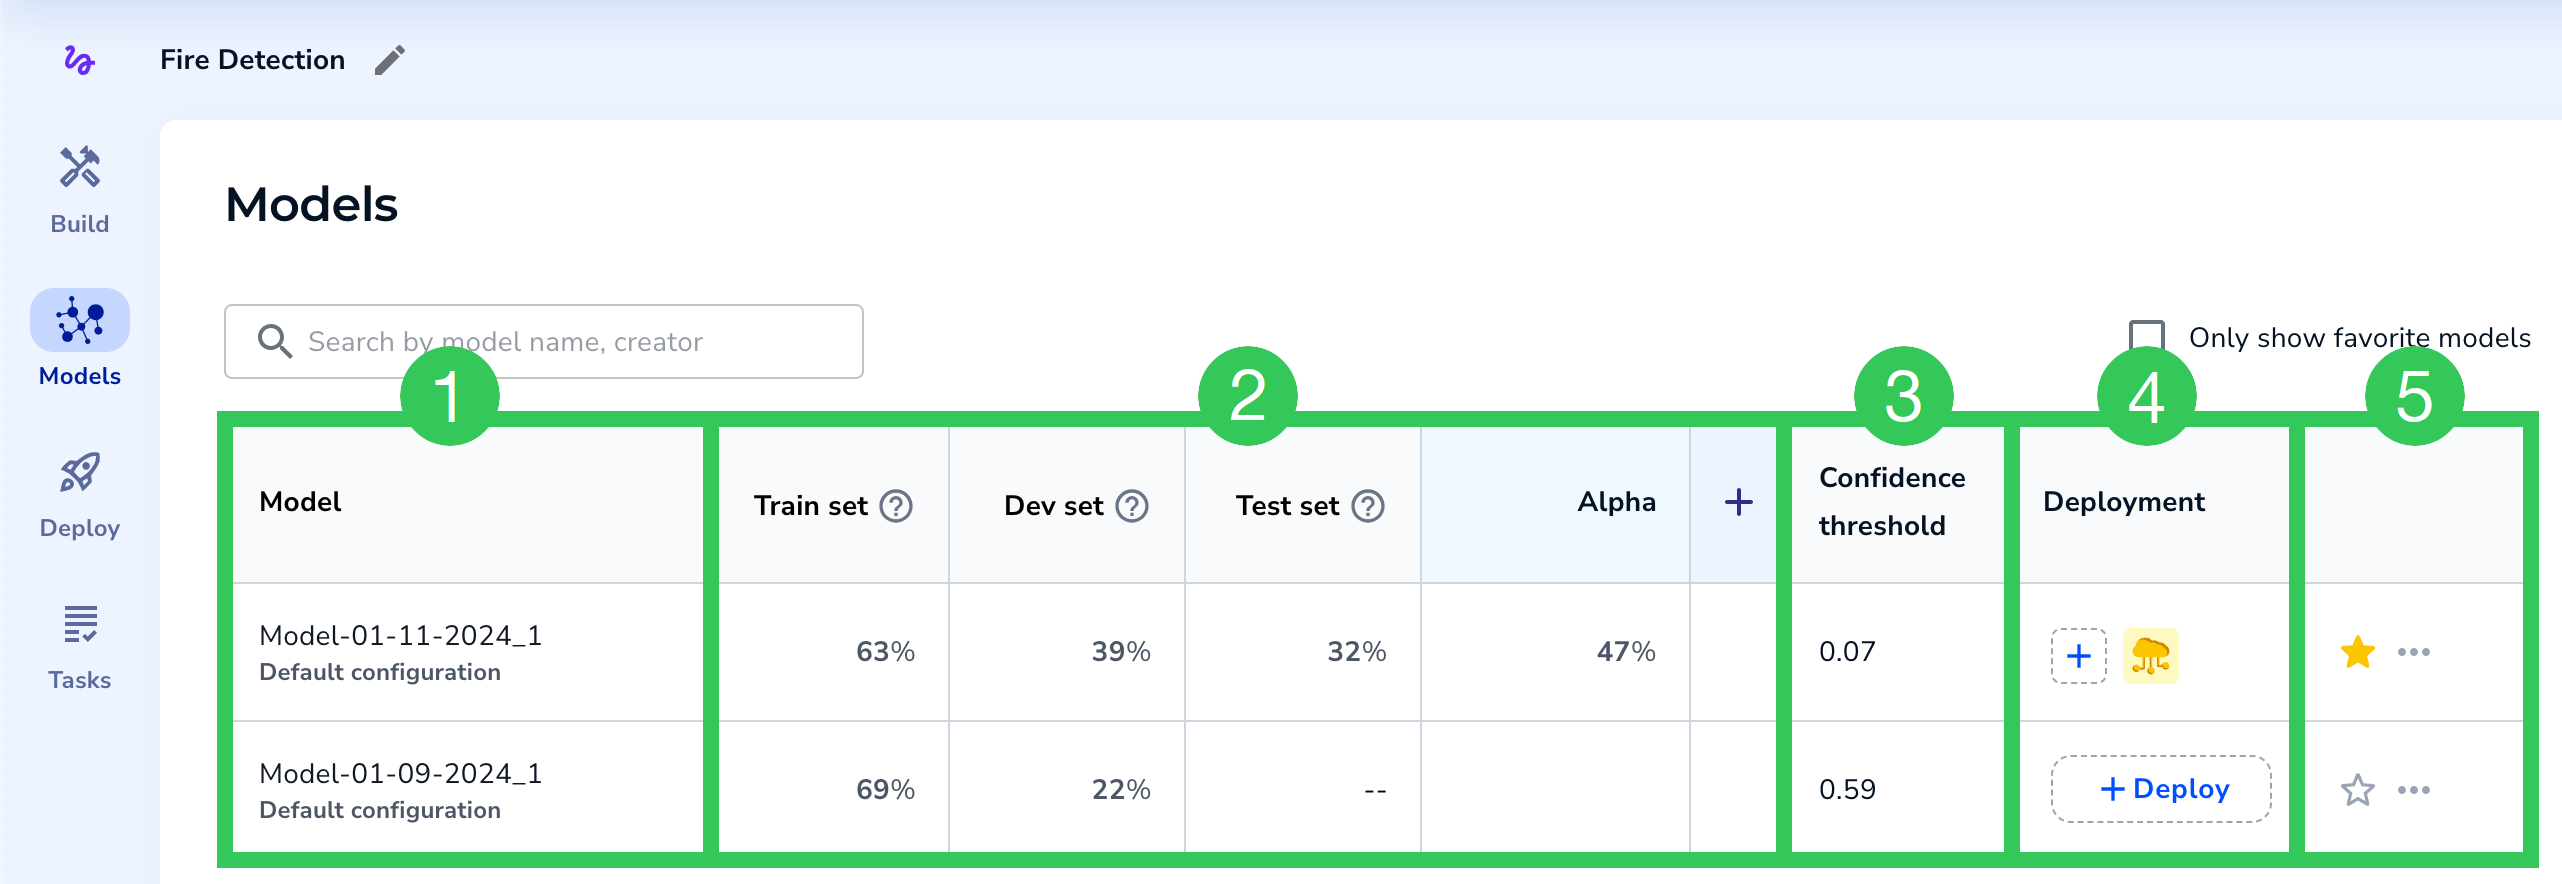
Here's a quick orientation to the Models table:
 Key Parts of the Models Table
| # | Item | Description |
|---|---|---|
| 1 | Model | The model name and training method (customized or default). |
| 2 | Evaluation sets | These columns consist of your evaluation sets, which are sets of images used to evaluate model performance. The model's Train, Dev, and Test sets display by default. You can add more datasets and run the models on those sets. Shows the F1 score (for Object Detection and Classification projects) and IoU score (for Segmentation projects). |
| 3 | Confidence Threshold | The Confidence Threshold for the model. The Confidence Score indicates how confident the model is that its prediction is correct. The Confidence Threshold is the minimum Confidence Score the model must assign to a prediction in order for it to believe that its prediction is correct. When LandingLens creates a model, it selects the Confidence Threshold with the best F1 score for all labeled data. |
| 4 | Deployment | Deploy the model via Cloud Deployment. If the model has been deployed with Cloud Deployment, an icon for each endpoint displays. |
| 5 | More Actions | Favorite, deploy, and delete models. Can also copy the Model ID. |
Model Information
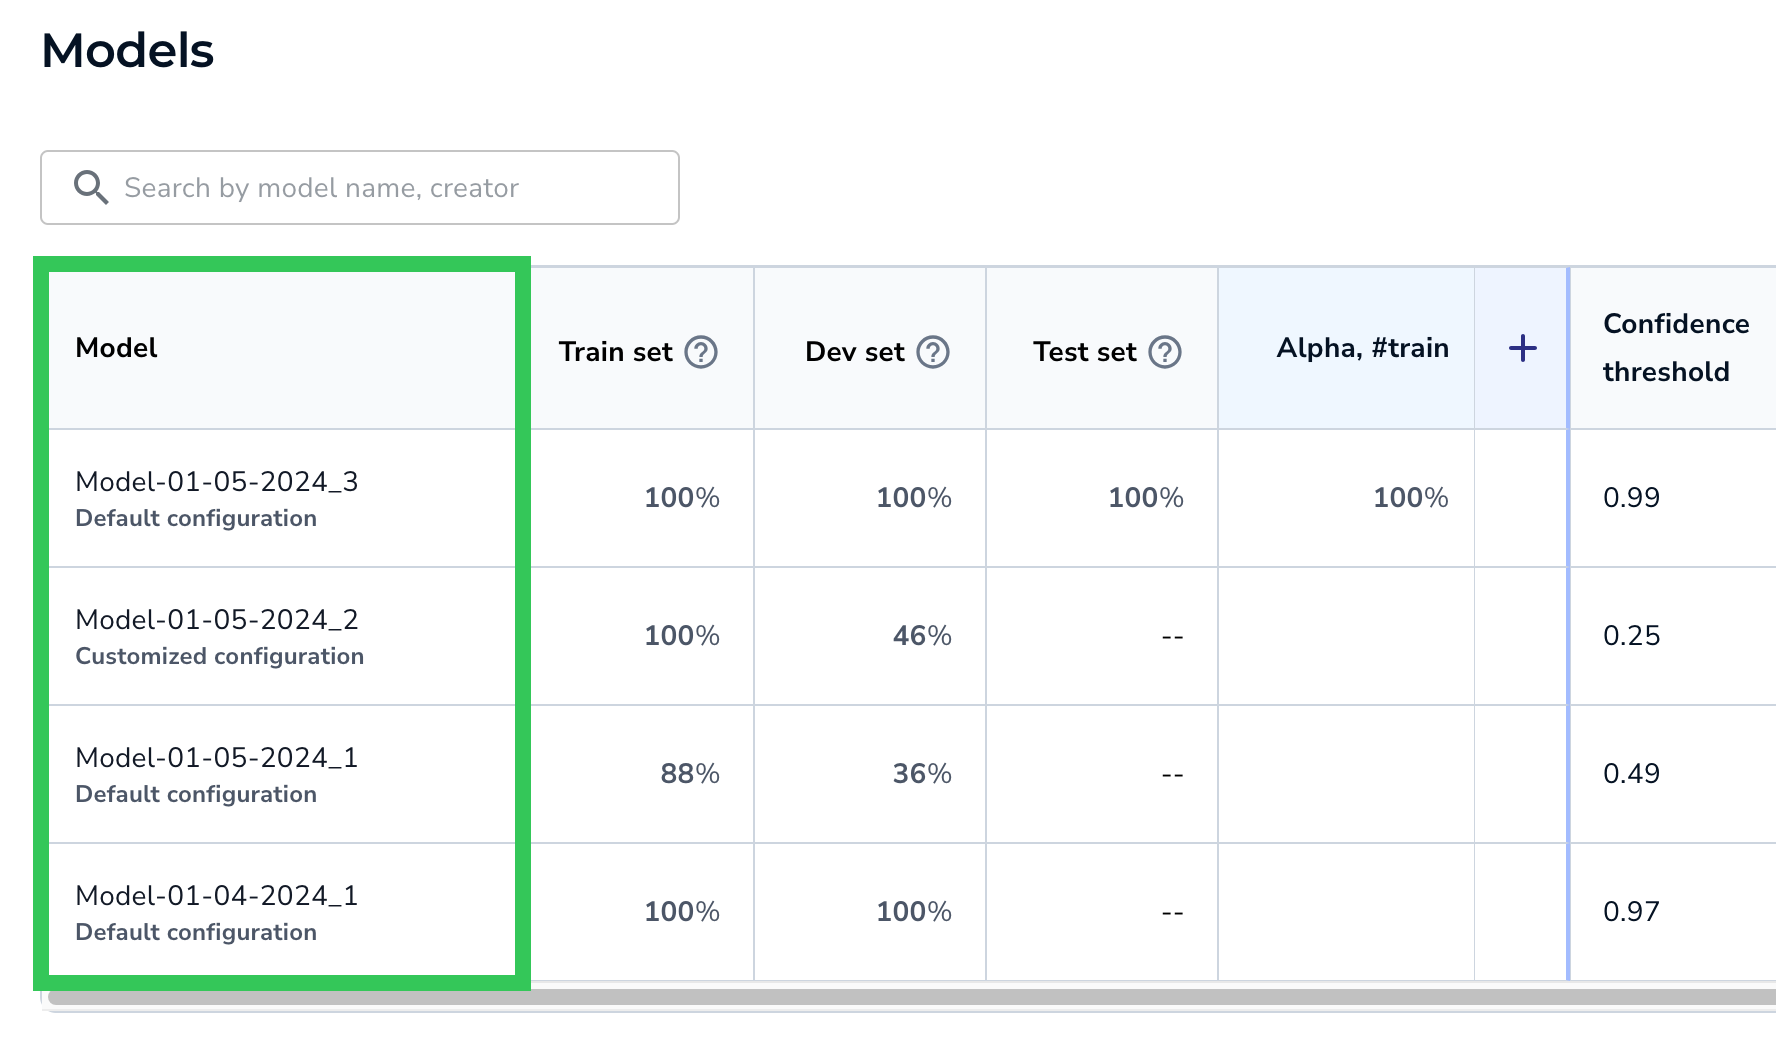
The Model column displays the model name and its training method:
- Default configuration: Trained using Fast Training.
- Customized configuration: Trained using Custom Training.
 Models
Click the cell to see the model's Training Information and Performance Report.
A model can have multiple rows. For example, if you deploy a model and select a confidence score that is not the default one, then two rows for the model display in the table. The first row has the default confidence threshold, and the second has the custom confidence threshold.
For example, in the screenshot below, the default confidence threshold is 0.71, and the custom confidence threshold is 0.99.
 Compare How the Same Model Performs with Different Confidence Thresholds
Training Information
Clicking a model on the Models page opens the Training Information tab. This tab shows basic information about the model and the dataset it was trained on.
Highlights include:
 Training Information
 Training Information, Continued
| # | Item | Description |
|---|---|---|
| 1 | Loss Chart | The Loss chart is calculated on the Train split, which is the split that the model trains on. During model training, LandingLens calculates the error between the ground truth and the predictions, which is called loss. This chart shows the loss over time (in seconds). If the model improves during the training process, the line goes down toward 0 over time. |
| 2 | Validation Chart | The Validation chart is calculated on the Dev split. This chart displays when the model was trained using Custom Training and the Dev split has at least 6 images. If the model improves during the validation process, the line goes up over time. The line will look slightly different for each project type because each uses a different validation metric:
|
| 3 | Trained From | The name of the dataset snapshot that the model was trained on. |
| 4 | Split | Shows how many images are in each split. |
| 5 | View Images | Click View Images to see the dataset snapshot that the model was trained on. |
| 6 | Hyperparameter Transform Augmentation | The configurations used to train the model. For Fast Training (default configuration), this includes Hyperparameters, which are the number of epochs and model size. For Custom Training (customized configuration), this also includes any Transforms and Augmentations. For more information about these configurations, go to Custom Training. |
Performance Report
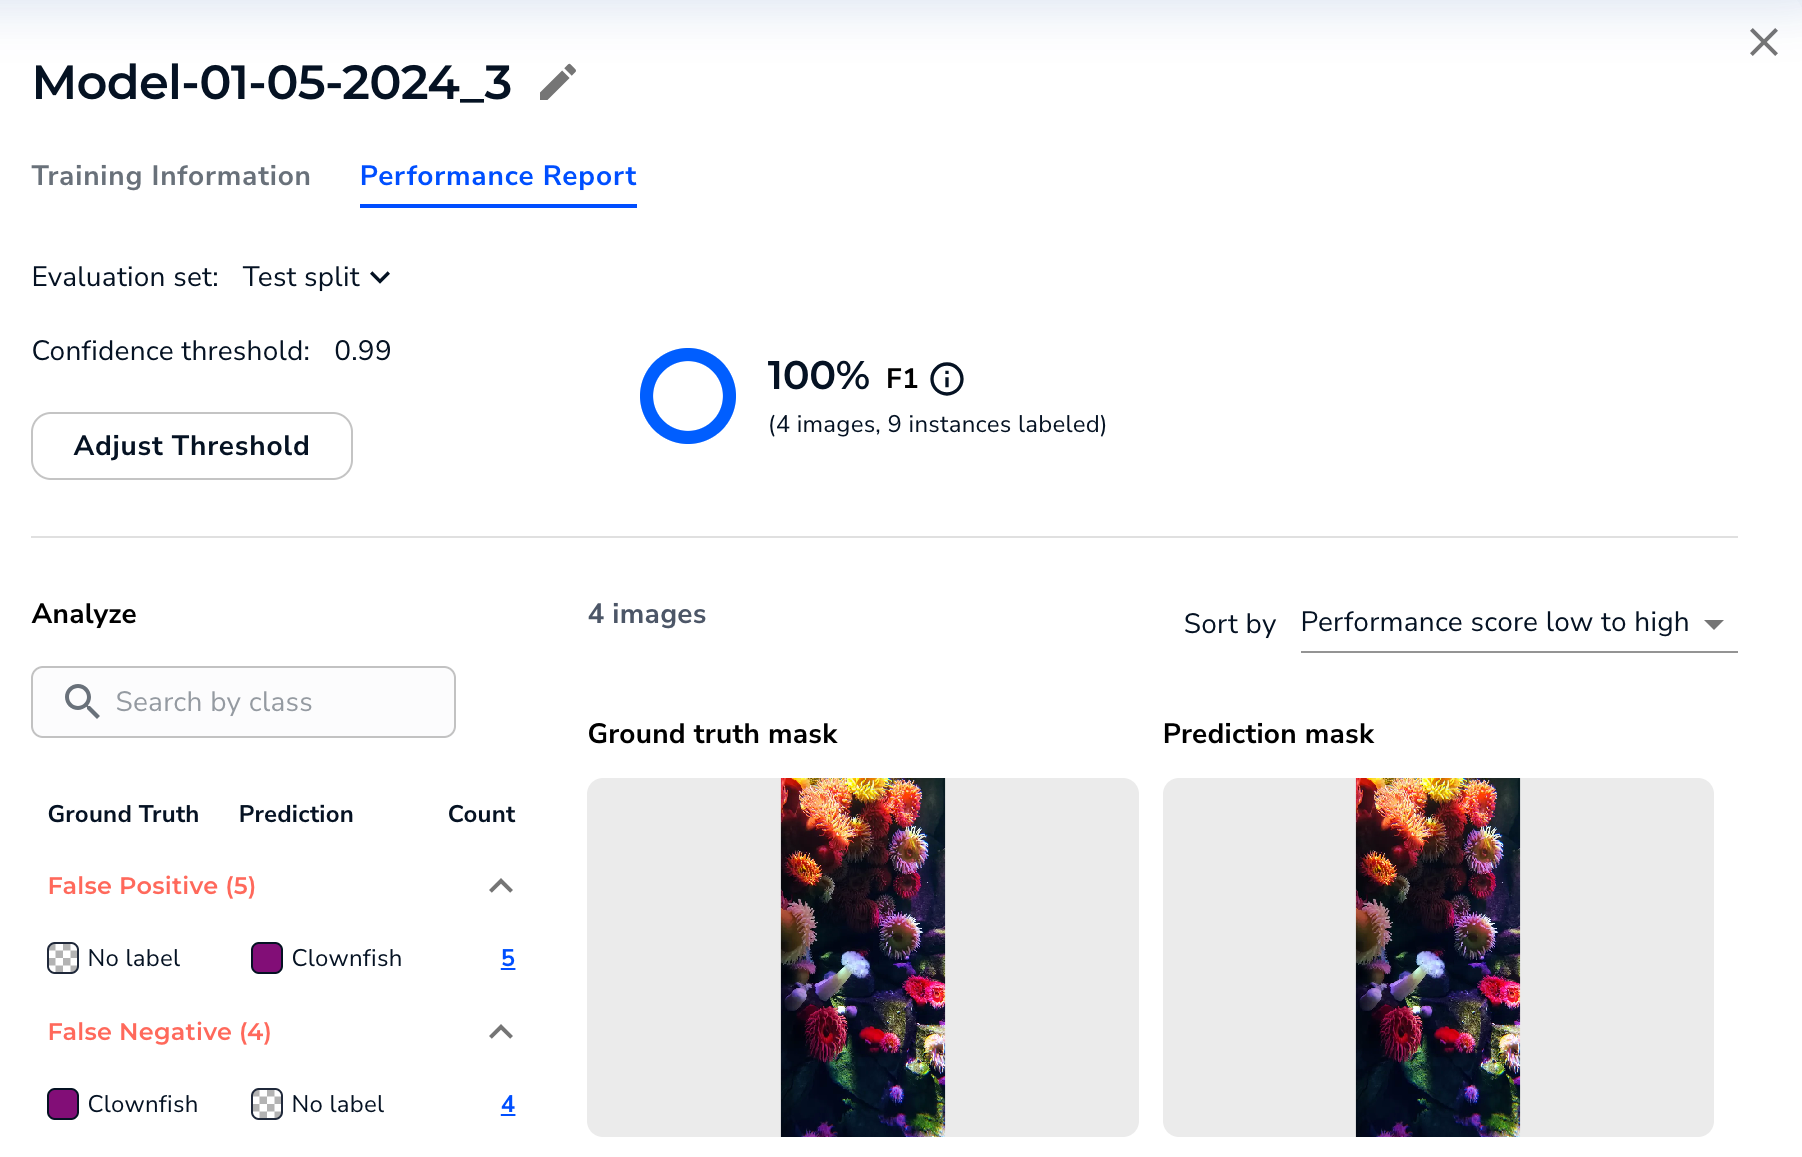
Clicking an evaluation set score on the Models page opens the Performance Report tab (you can also click a model on the Models page and then select this tab).
This report shows how the model performed on the selected evaluation set (and not for the entire dataset). You can select different sets from the Evaluation Set drop-down menu.
The bottom part of the report compares the ground truth (your labels) to the model's predictions. You can filter by prediction type (False Positive, False Negative, Mis-Classification, and Correct Predictions) and sort by model performance.
 Performance Report for the Selected Evaluation Set.
The Performance Report and Build Tab May Have Different Results
The results in the Performance Report might be different than the results in the Build tab. This is because the Performance Report is based on a specific version of a dataset—the images and labels never change.
However, the results on the Build tab are “live” and might change based on any updates to images or labels.
For example, let’s say that you train a model and create an evaluation set based on the dataset currently in the Build tab. You then add images and labels. This leads to the performance and results being different, as shown in the screenshots below.
 The Performance Report Is Based on a Static Dataset
.png) The Performance in the Build Tab Changes Based on Changes to Images and Labels
The Performance in the Build Tab Changes Based on Changes to Images and Labels
Adjust Threshold
To see how the model performs on the evaluation set with a different Confidence Threshold, click Adjust Threshold and select a different score.
 Adjust the Confidence Threshold
Overall Score for the Evaluation Set
The Performance Report includes a score for the evaluation set (and not for the entire dataset). The type of score depends on the project type:
Object Detection and Classification: F1 Score
The Performance Report includes the F1 score for Object Detection and Classification projects.
The F1 score combines precision and recall into a single score, creating a unified measure that assesses the model’s effectiveness in minimizing false positives and false negatives. A higher F1 score indicates the model is balancing the two factors well. LandingLens uses micro-averaging to calculate the F1 score.
.png) Object Detection and Classification Projects Show the F1 Score
Object Detection and Classification Projects Show the F1 ScoreSegmentation: Intersection Over Union (IoU)
The Performance Report includes the Intersection over Union (IoU) score for Segmentation projects.
Intersection over Union (IoU) is used to measure the accuracy of the model by measuring the overlap between the predicted and actual masks in an image. A higher IoU indicates better agreement between the ground truth and predicted mask. LandingLens does not include the implicit background and micro-averaging in the calculation of the IoU.
 Segmentation Projects Show the Intersection Over Union (IoU) Score
Evaluation Sets
The Models table shows how each model performs on different sets of images. These image sets are called evaluation sets, because they're used to evaluate model performance.
The default evaluation sets are the Train, Dev, and Test splits for the models. You can add evaluation sets.
Click a cell to see the Performance Report for that evaluation set.
.png) Evaluation Sets
Evaluation SetsEvaluation Set Scores
A good indication that a model performs well is that its Train and Dev set scores are high and similar to each other.
The score for the Train set might be higher than the scores for the other splits, because these are the images that the model trains on. It is normal for the Train set score to be less than 100% because models usually make mistakes during the training process.
In fact, a score of 100% on the Train might indicate overfitting, especially if the Dev set score is much lower. If the two scores are very different, try adding more images to these sets.
Similarly, the score for the Test set might be lower than the scores for the other splits, because the model is not trained on these images.
The following image and table explain the evaluation set scores.
.png) Evaluation Set Scores
Evaluation Set Scores| # | Item | Description |
|---|---|---|
| 1 | Percentage | Shows the F1 score (for Object Detection and Classification projects) and IoU score (for Segmentation projects). Learn more about these scores in Overall Score for the Evaluation Set. |
| 2 | -- | The subset doesn't have any images. If you don't assign splits to a dataset before you train a model, LandingLens automatically assigns images to the Train and Dev splits, but not the Test split. Therefore, you will see "--" for the Test split in that situation. |
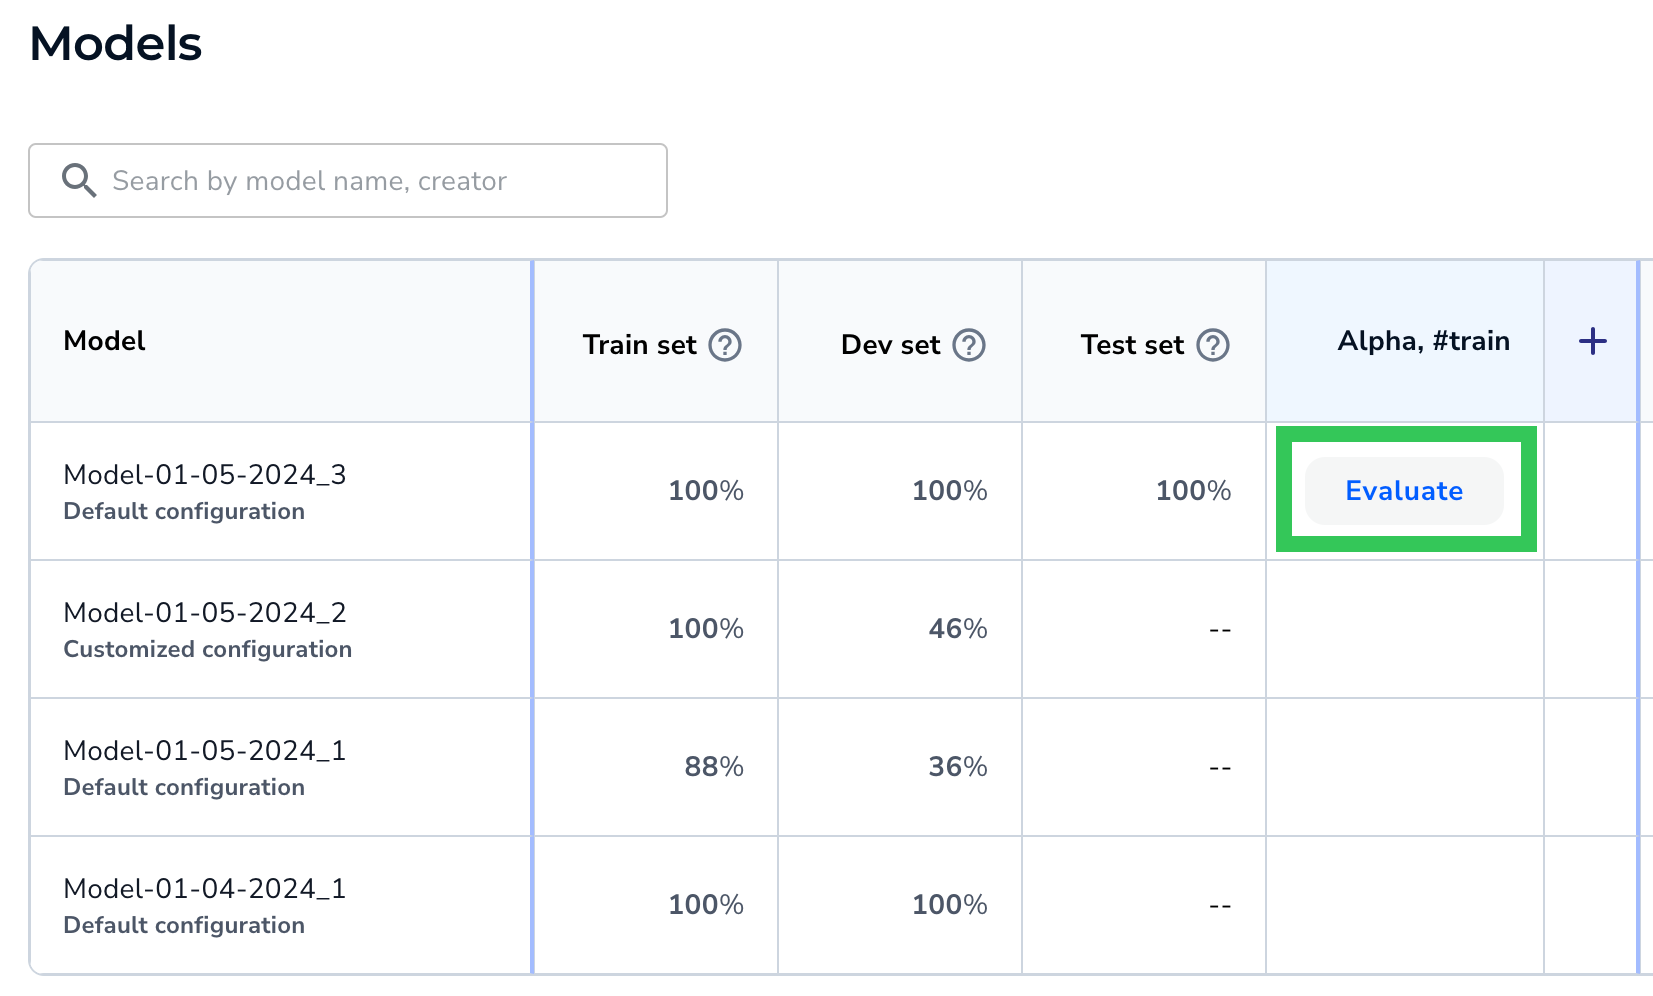
| 3 | Blank | The model hasn't run on the set yet. To run the model, hover over the cell and click Evaluate. For more information, go here. |
Run the Model on a "Blank" Set
If an evaluation set cell is blank, hover over the cell and click Evaluate. The model runs inference on the images in that evaluation set and displays the score.
.gif) Run the Model on a "Blank" Evaluation Set
Run the Model on a "Blank" Evaluation SetAdd Evaluation Sets and Run Models on Them
Note:
Evaluation sets cannot be deleted.
By default, each model's performance score for its Train, Dev, and Test set scores displays in the Models table. You can add more datasets. These are called evaluation sets, because they're used to evaluate model performance.
To add an evaluation set:
- Open the project to the Models tab.
- Click Add Evaluation Set. If you've already dismissed this message, click + in the table header.
.png) Add an Evaluation Set
Add an Evaluation Set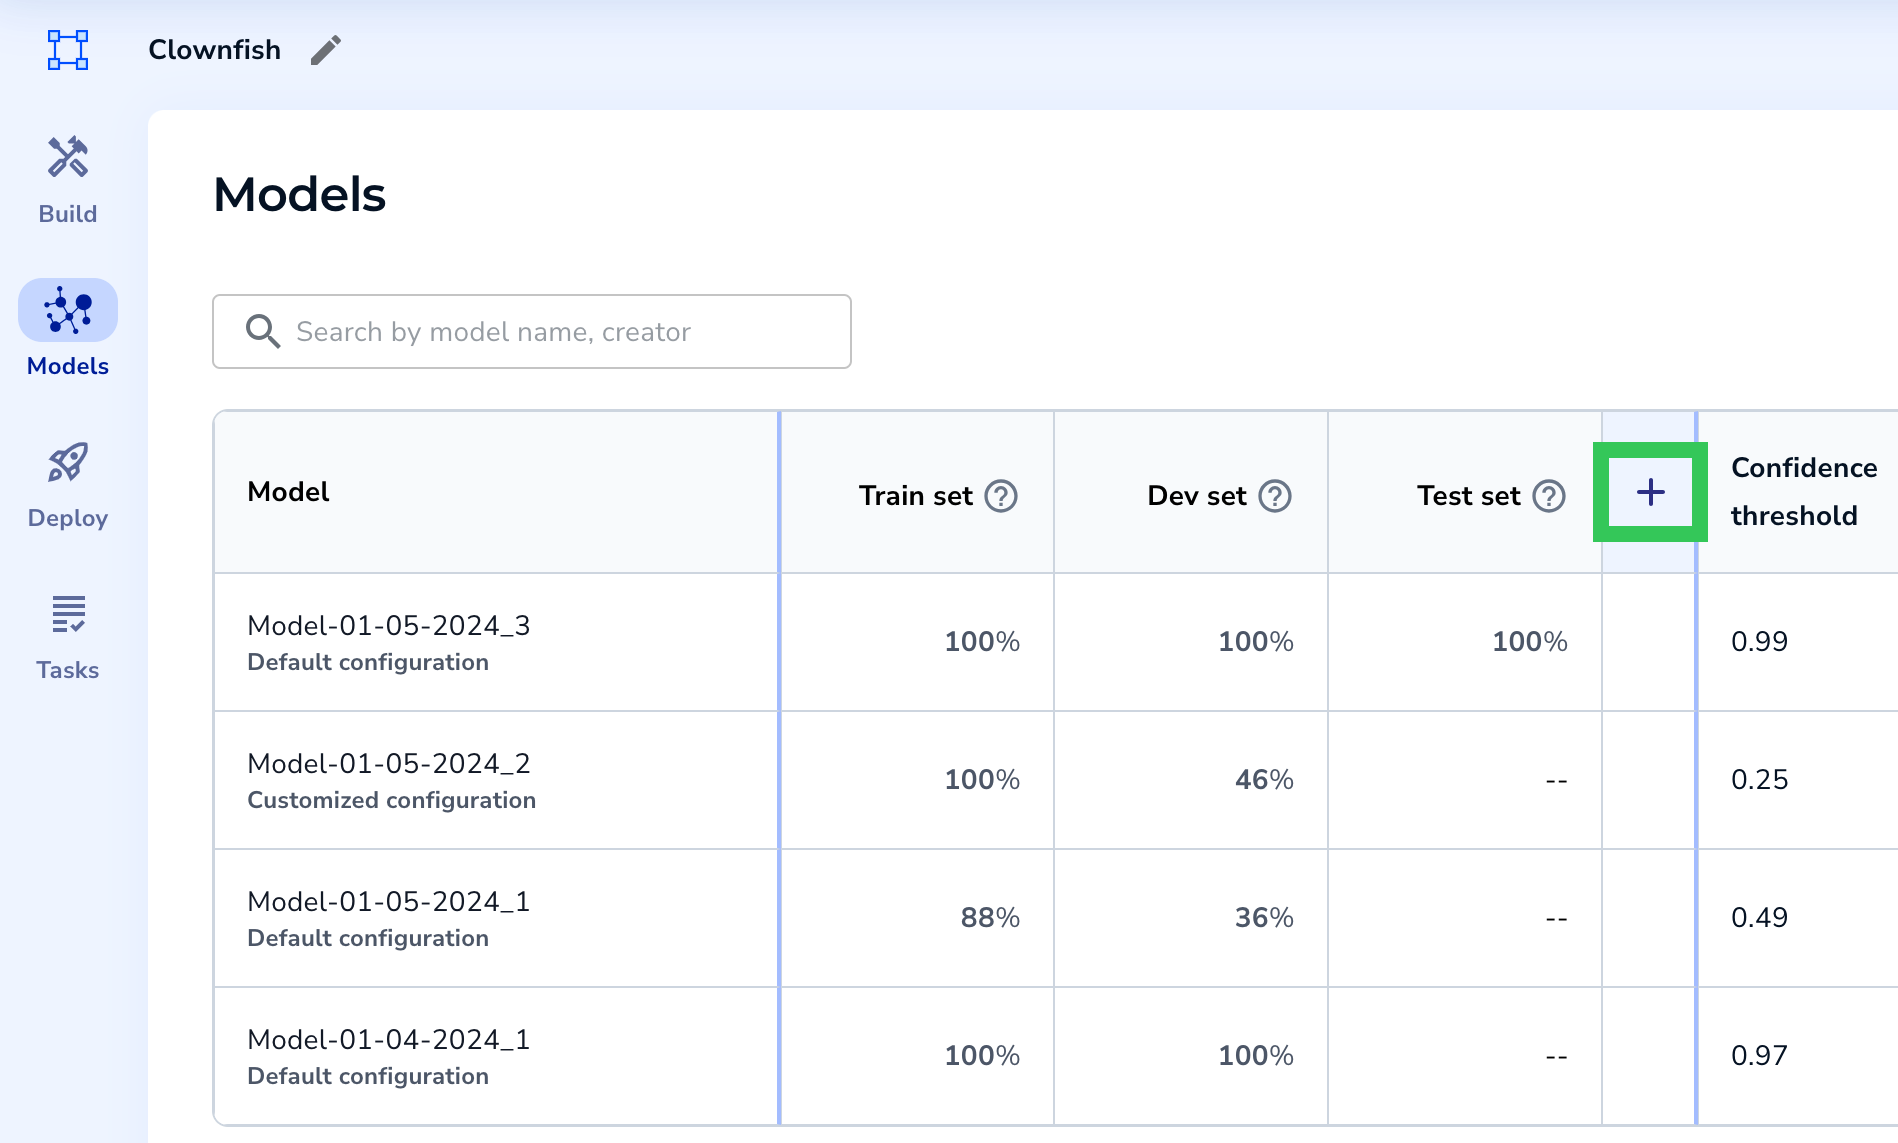 Add an Evaluation Set (If You've Already Dismissed the Message)
 - Select a snapshot.
- If you want to run the model only on one of the splits, click that split.
- Click Add to the Table.
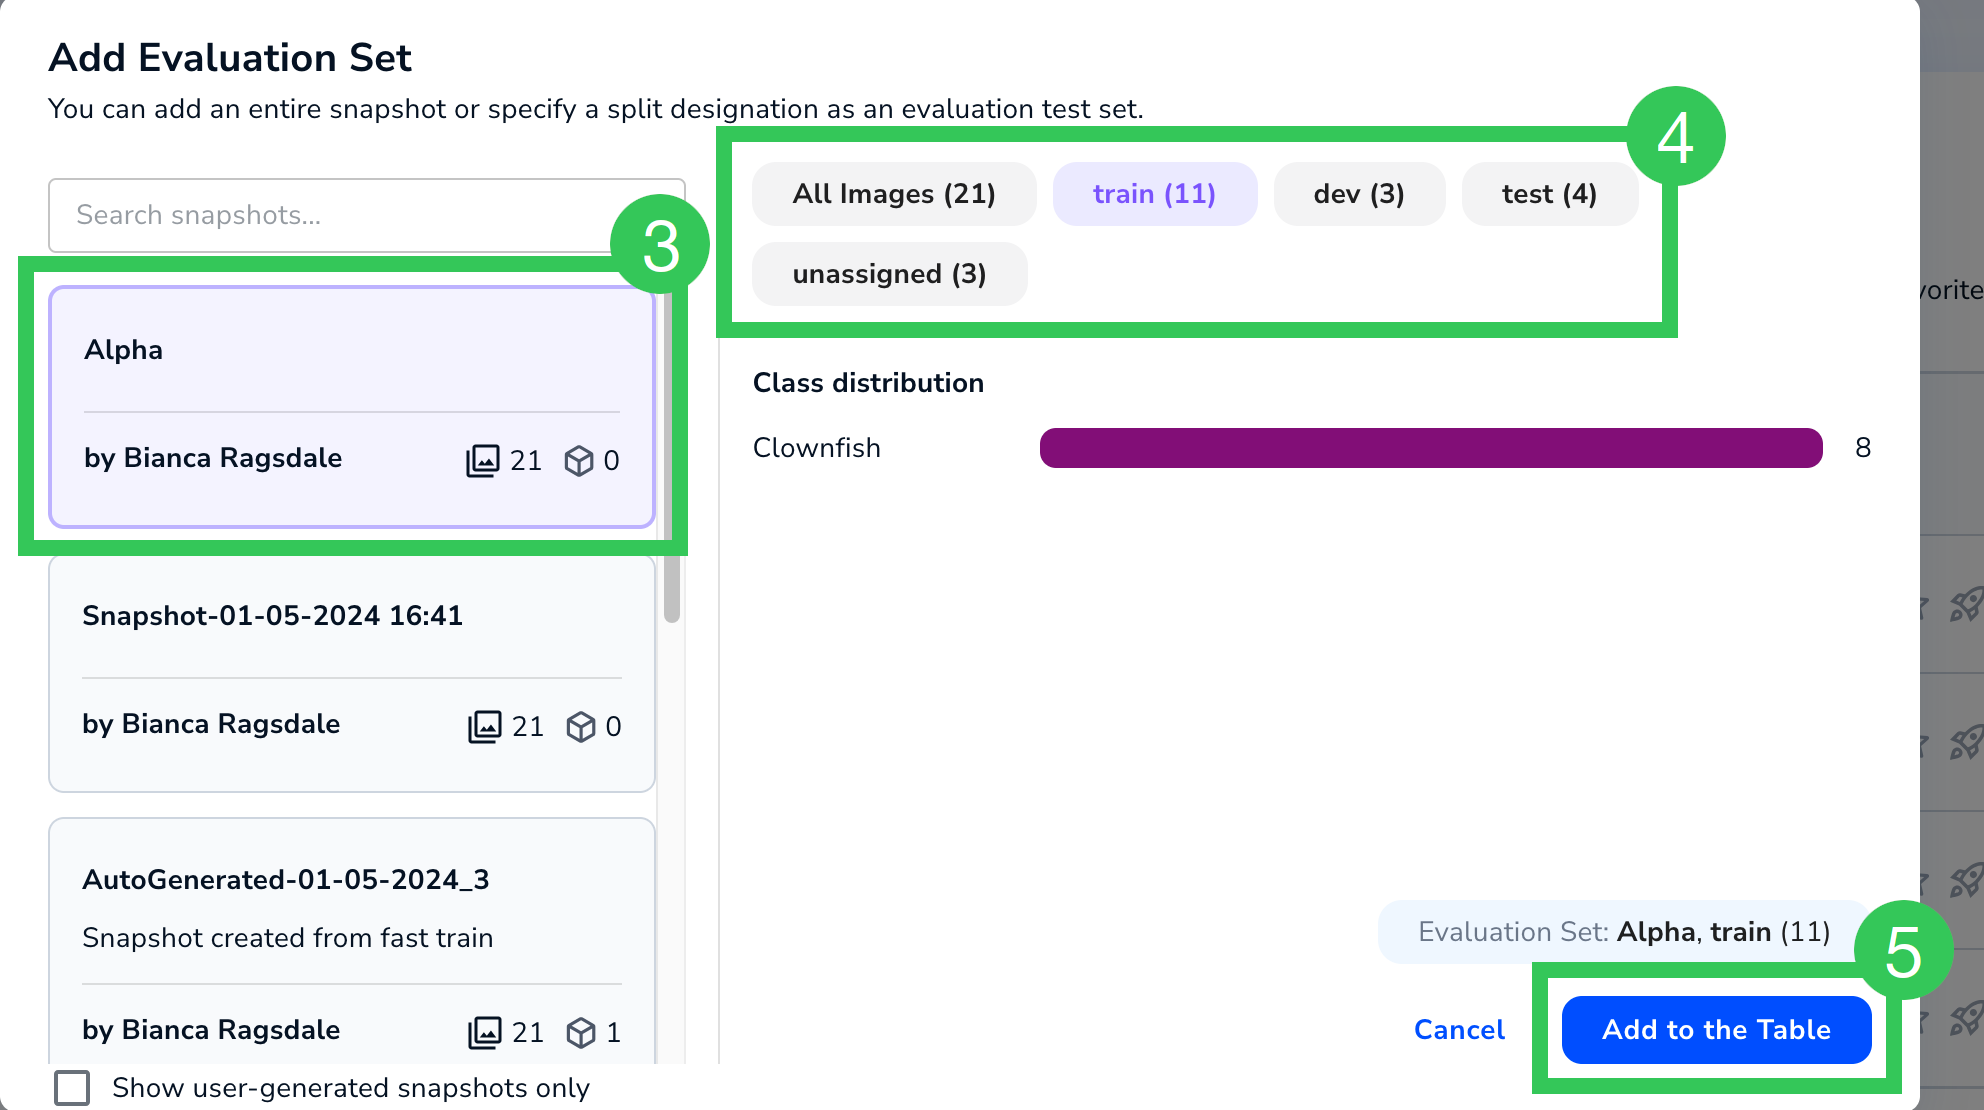 Select a Snapshot to Use as an Evaluation Set
 - LandingLens adds a column for that dataset. To run a model on the dataset, hover over the cell and click Evaluate. (To prevent slowing down the system, LandingLens doesn't automatically run each model on the evaluation sets. Click Evaluate for each model / evaluation set combination that you want to run.)
 Run the Model on a Specific Evaluation Set
 - The model runs inference on the images in that evaluation set and displays the F1 or IoU score.
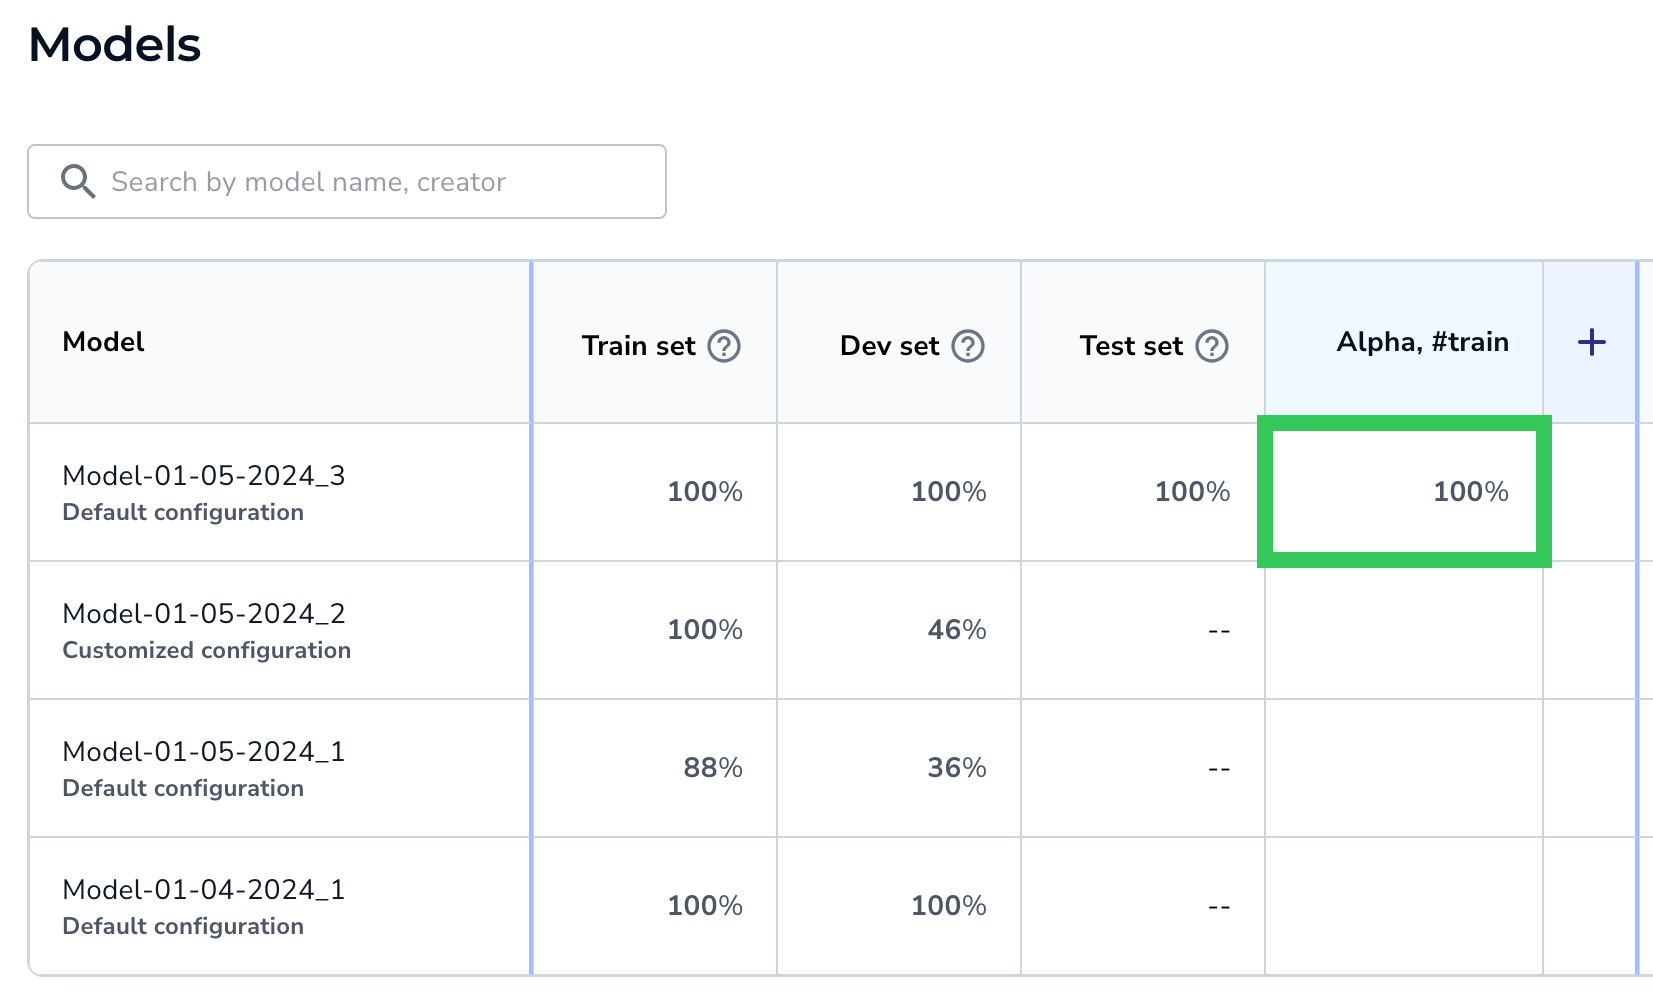 The Score Displays
 - Click the percentage to open the Performance Report.
 View the Performance Report for the Evaluation Set
.png)


Archive Evaluation Sets
You can archive evaluation sets. This removes the evaluation set column from the Models table. You can later add the evaluation set to the table again.
To archive an evaluation set:
- Open the project to the Models tab.
- Hover of the area to the left of the evaluation set name.
- Click the Archiveicon that appears.
 Hover to See the Archive Icon and Click It
 - Click Yes on the pop-up window to confirm the action.

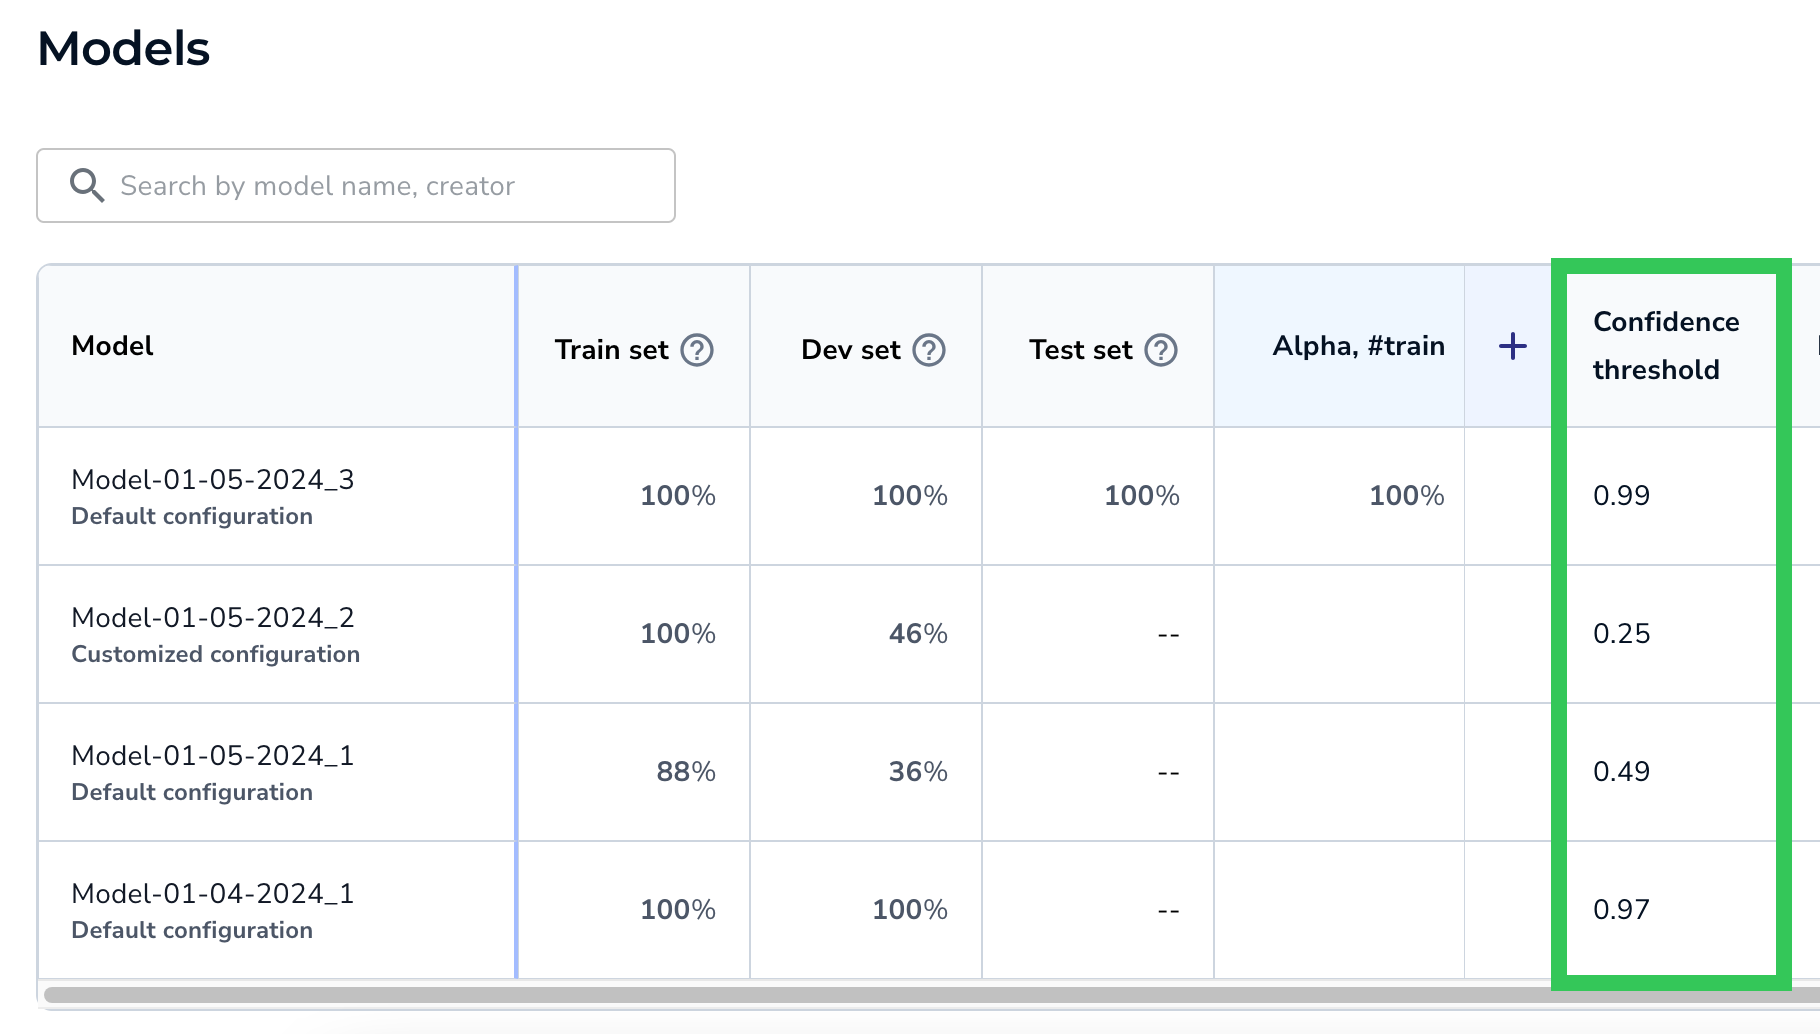
Confidence Threshold
The Confidence Threshold column shows the Confidence Threshold for that model.
The Confidence Score indicates how confident the model is that its prediction is correct. The Confidence Threshold is the minimum Confidence Score the model must assign to a prediction in order for it to believe that its prediction is correct.
When LandingLens creates a model, it selects the Confidence Threshold with the best F1 score for all labeled data.
 Confidence Threshold
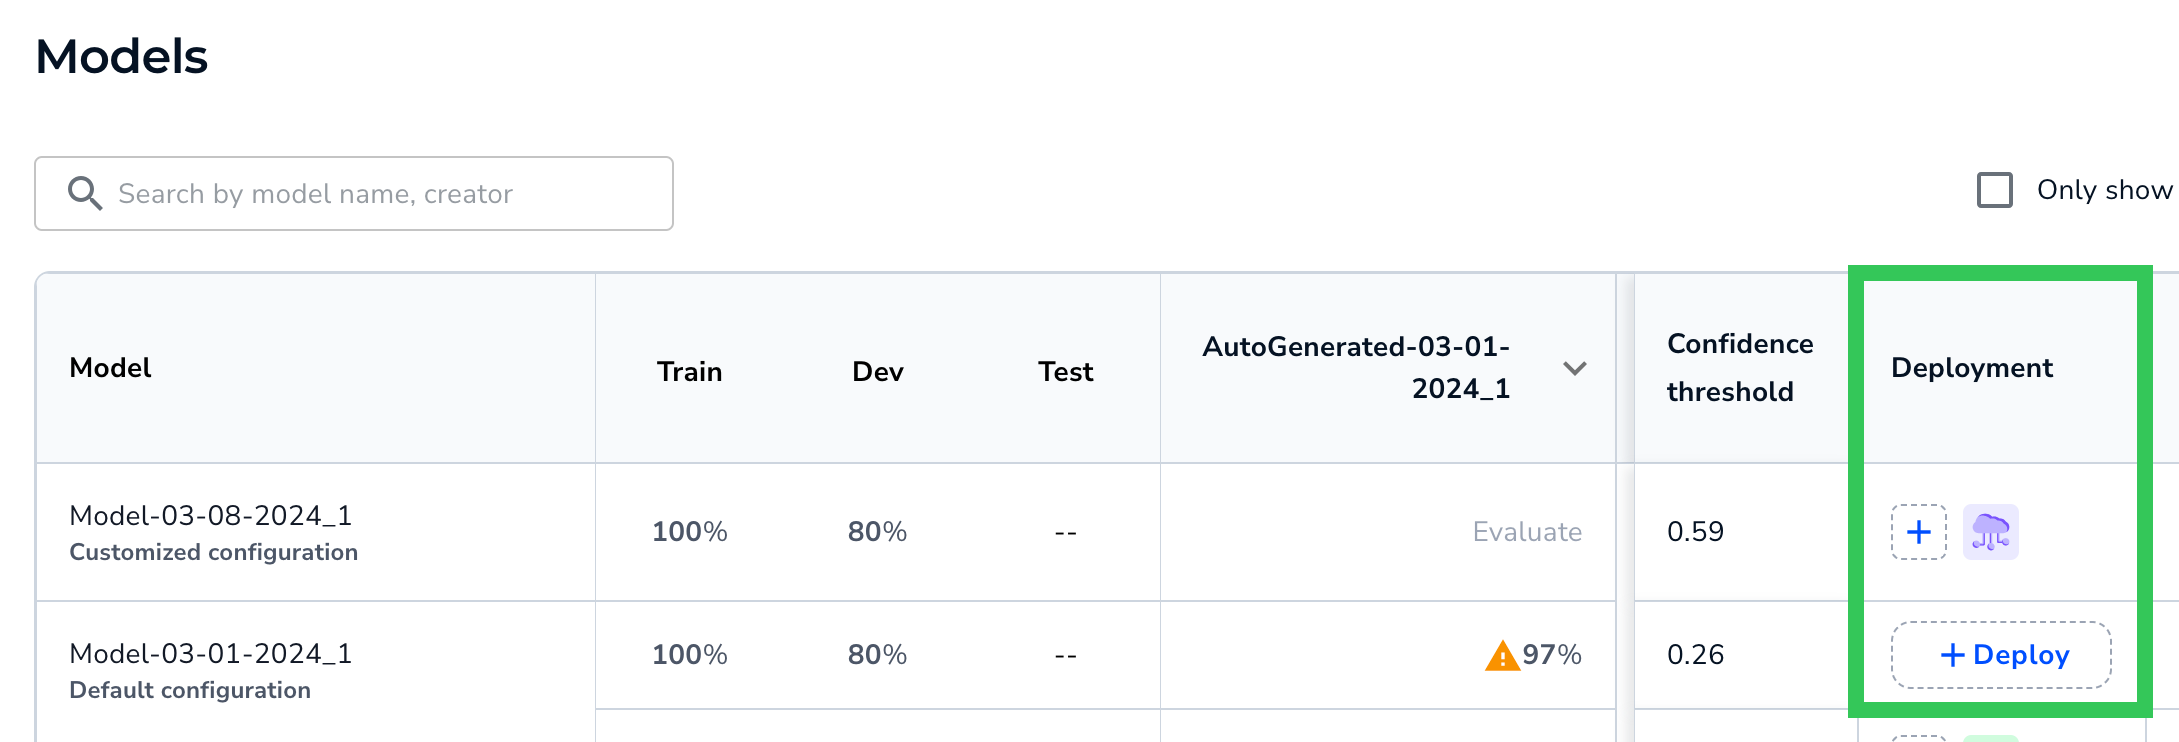
Cloud Deployment
The Deployment column allows you to deploy a model via Cloud Deployment, and to see how many times the model has been deployed via Cloud Deployment.
To start the deployment process, click the Deploy or + button in the Deployment column. For more information, go to Cloud Deployment.
A Cloud icon displays for each deployment. Click an icon to see the deployment details for the model. LandingLens cycles through seven colors for the Cloud icon.
 View and Start Deployments
Note:
Icons don't display for LandingEdge or Docker deployments.
More Actions
In the last column, you can:
 More Actions for Models
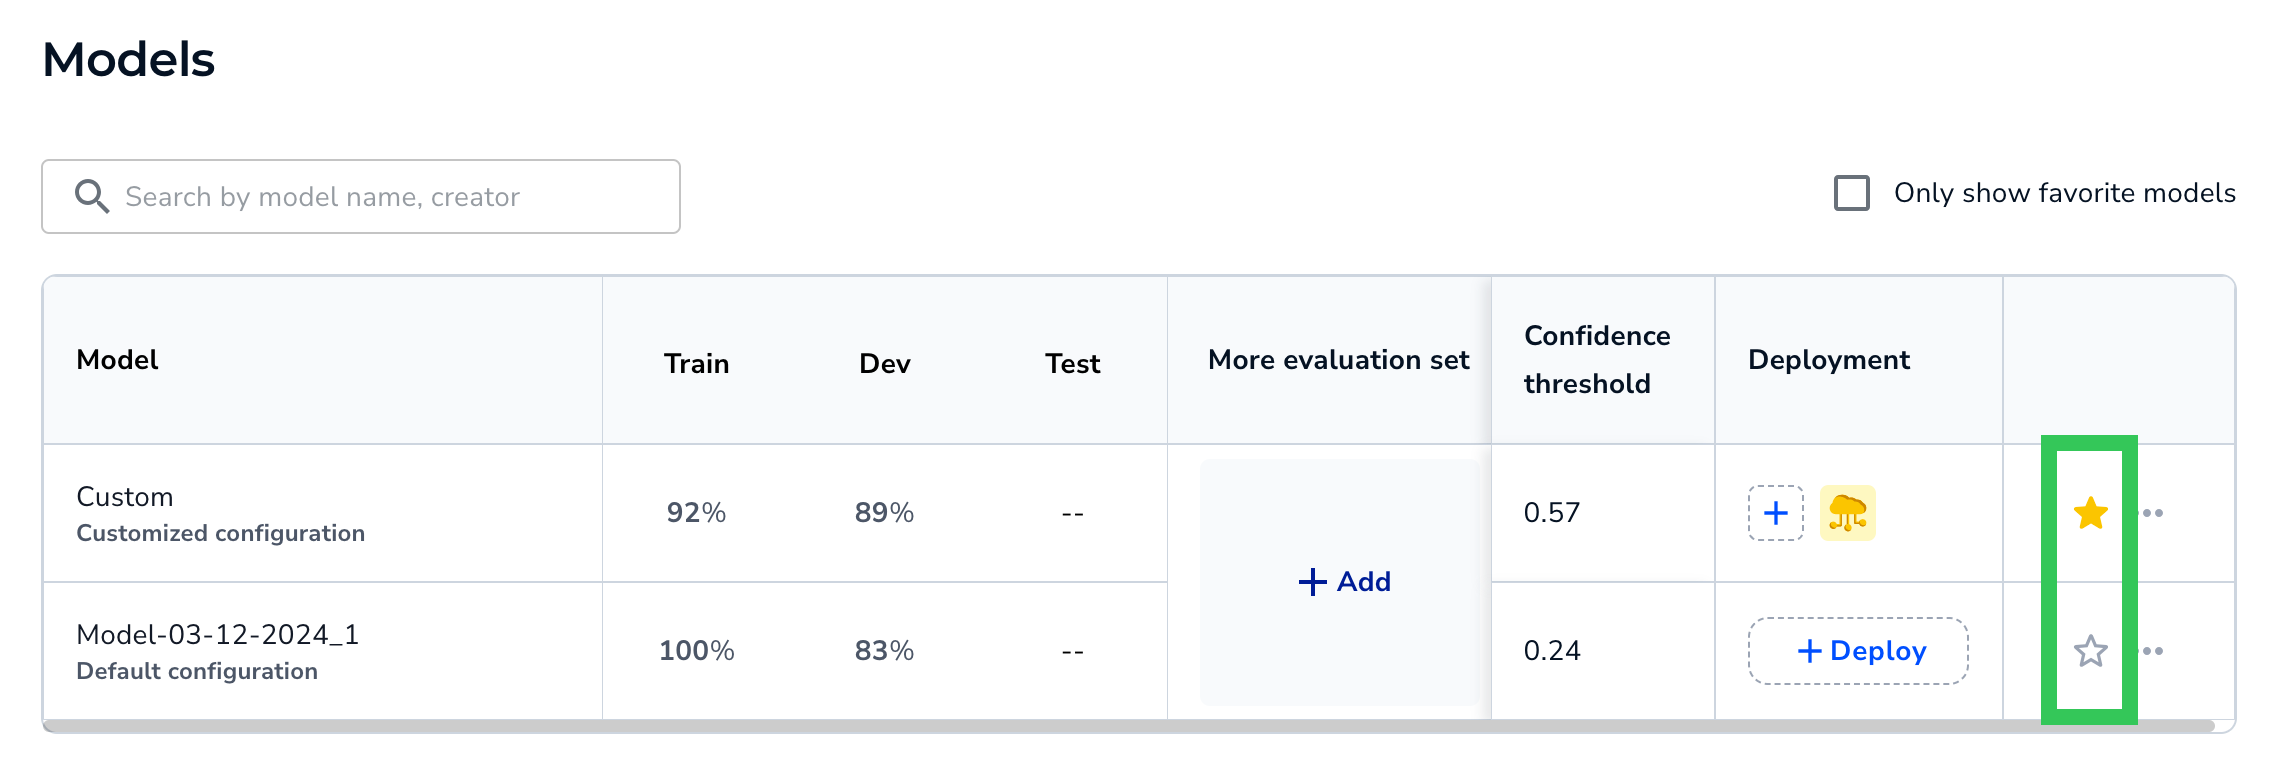
Favorite Models
To mark a model as a "favorite", click the Favorite (star) icon. This changes the star color to yellow, so that you can easily see which models in the table you've marked as favorites. You can favorite multiple models. To unfavorite a model, click the Favorite icon again.
 Click the Star to Favorite and Unfavorite Models
To filter by favorites, select the Only show favorite models checkbox.
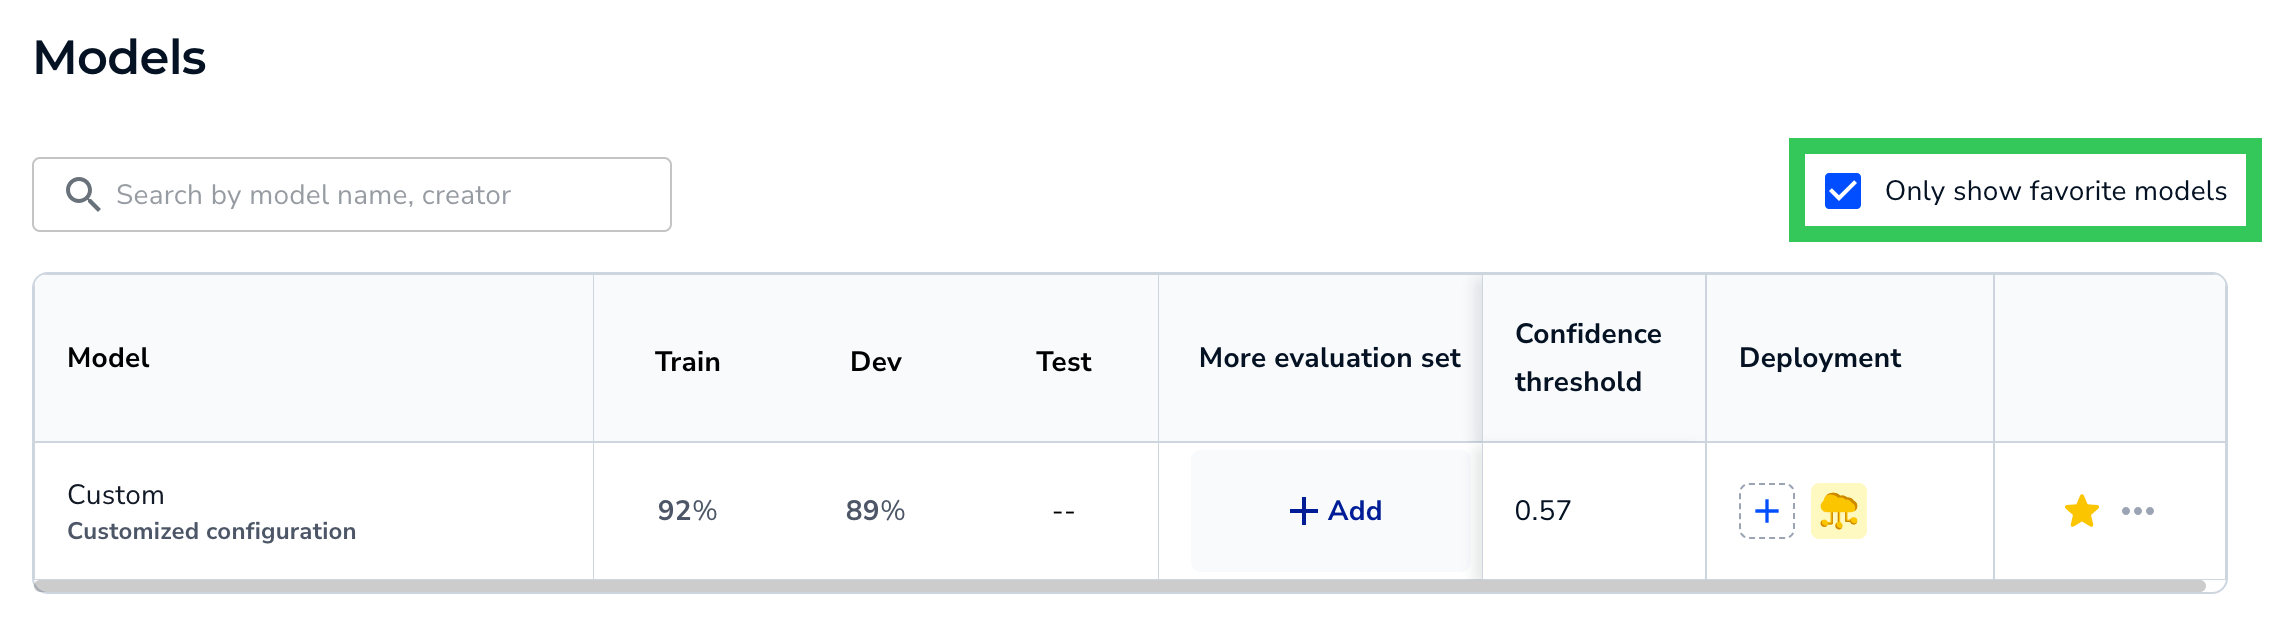 Filter by Favorites
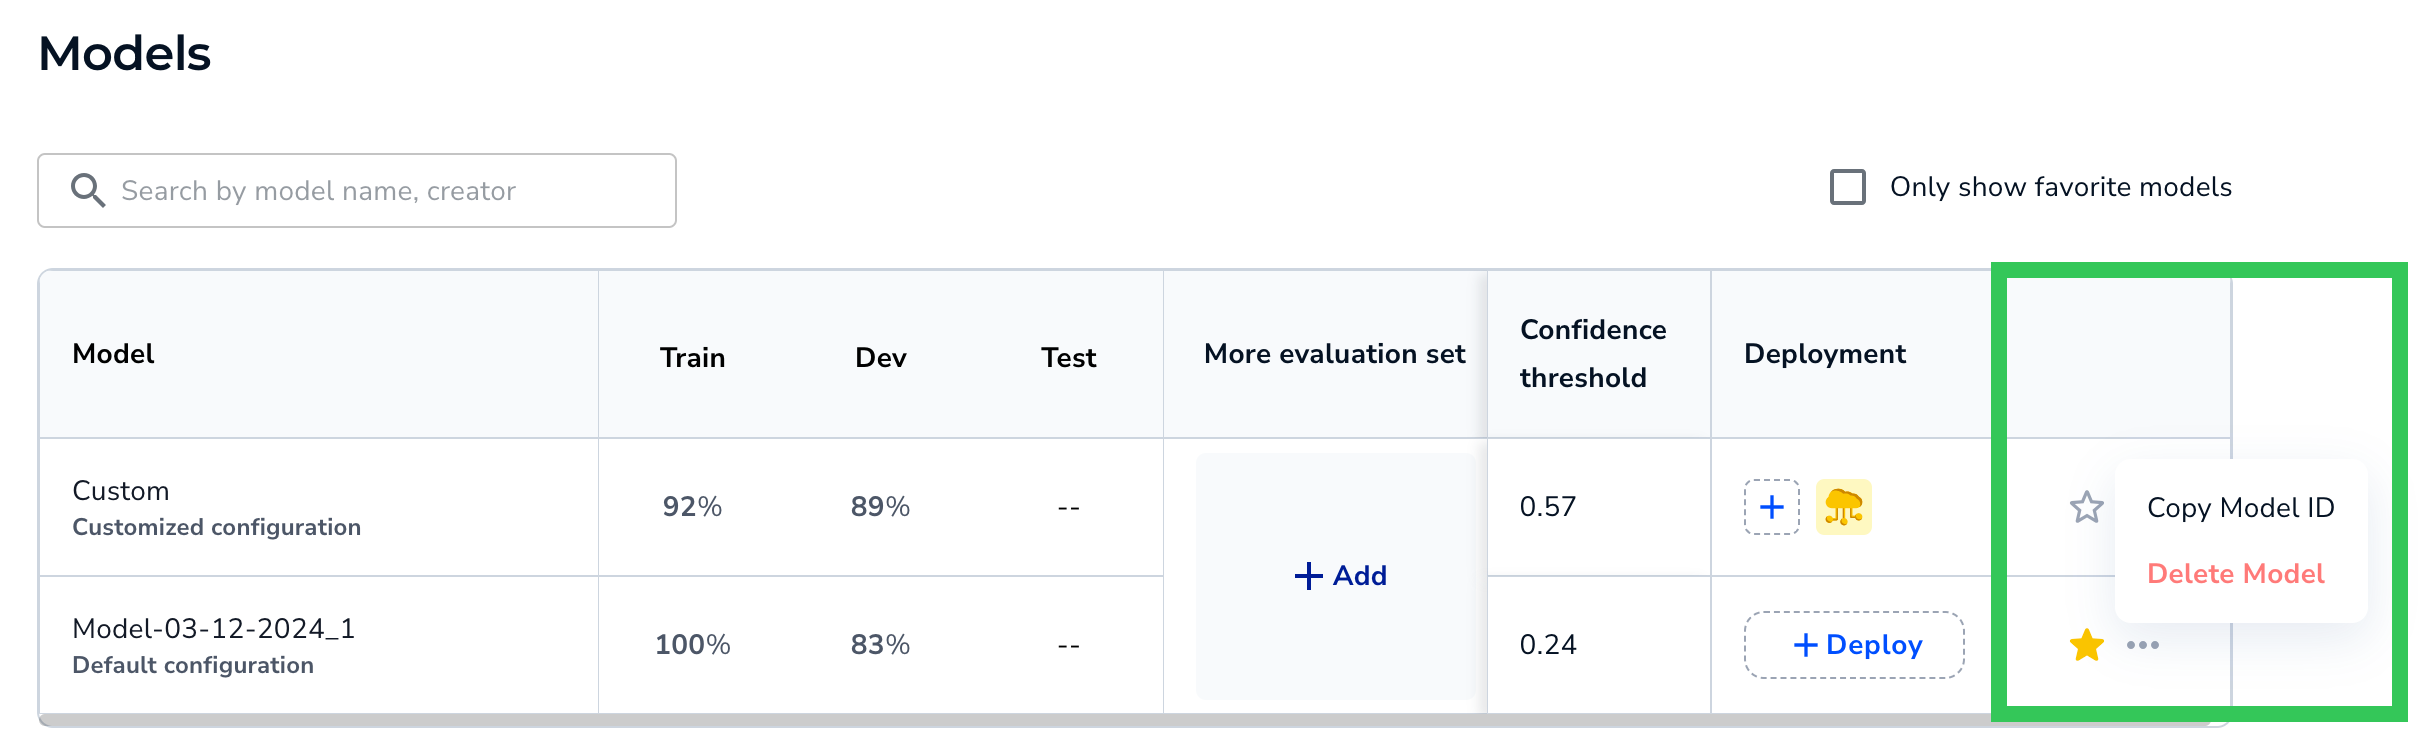
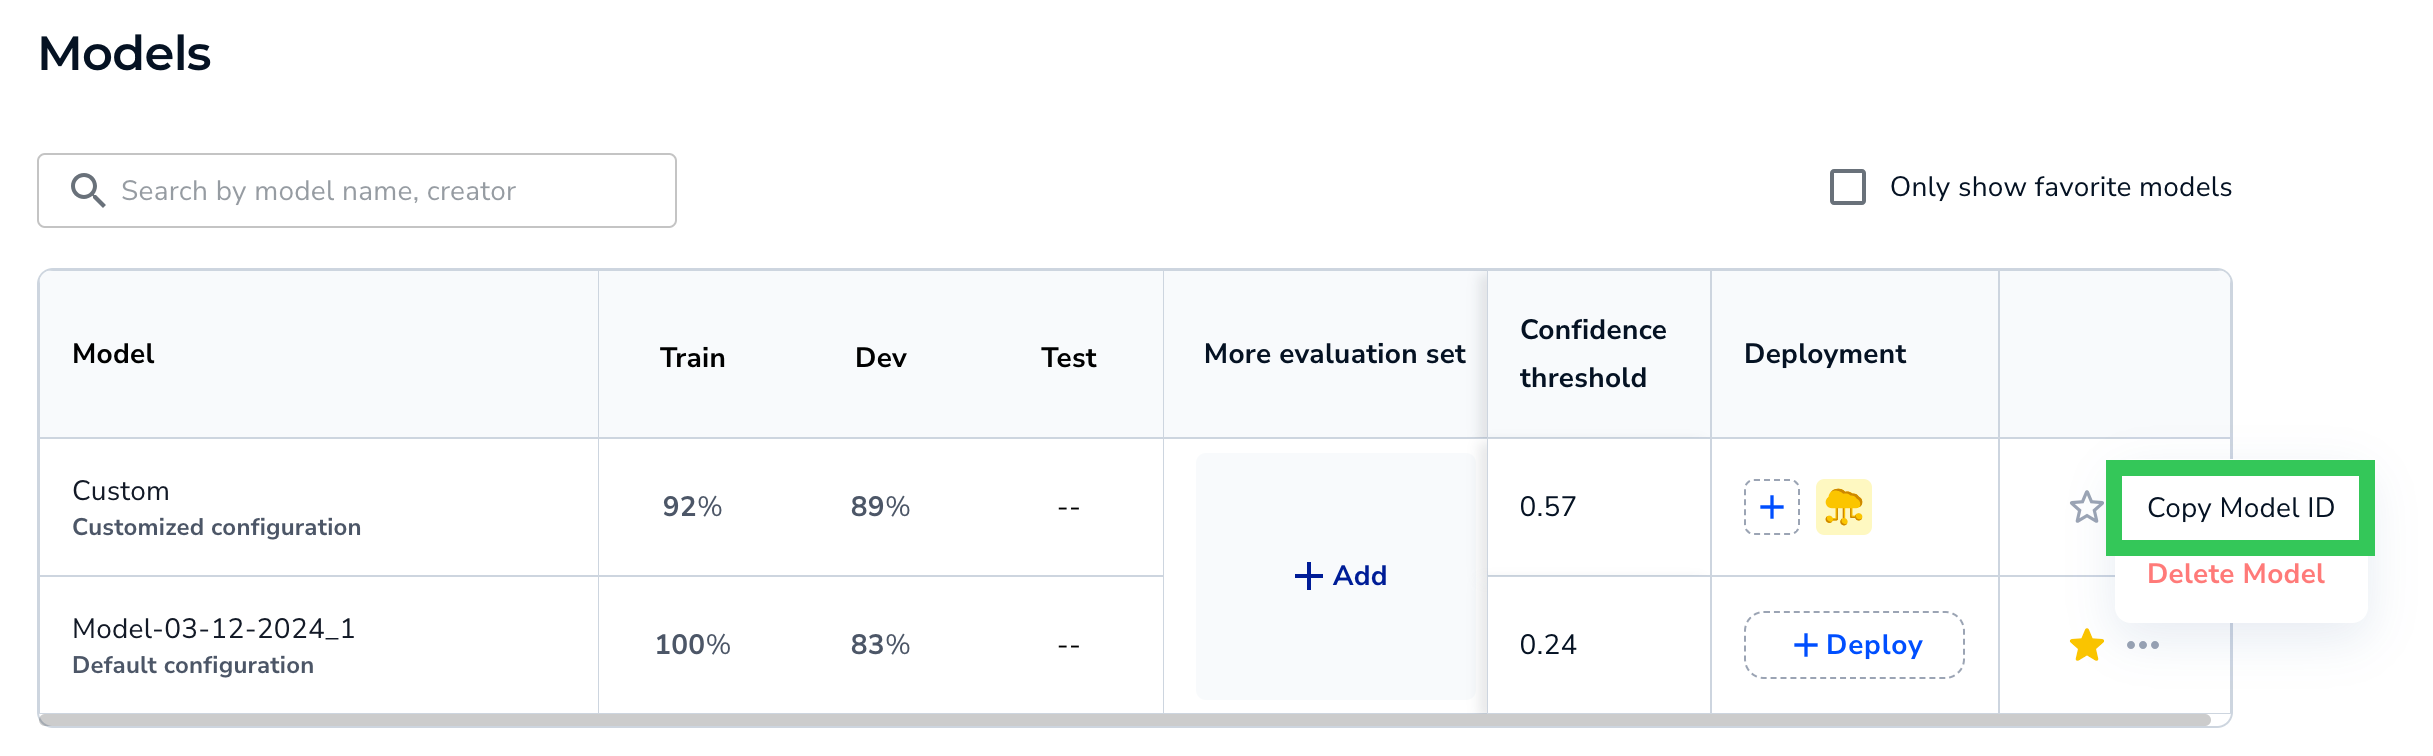
Copy Model ID
If you're deploying a model via Docker, the Model ID is included in the deployment command. The Model ID tells the application which model to download from LandingLens. To locate the Model ID on the Models page, click the Actions (...) icon and select Copy Model ID.
 Copy the Model ID
Note:
You can also copy the Model ID from the Deploy page.
Delete Models
You can delete a model from the table. This action removes the model only from the table; you can still deploy it and access it from other areas in LandingLens, like Dataset Snapshots.
To delete a model, click the Actions (...) icon and select Delete. A model can't be re-added to this table after it's been deleted.
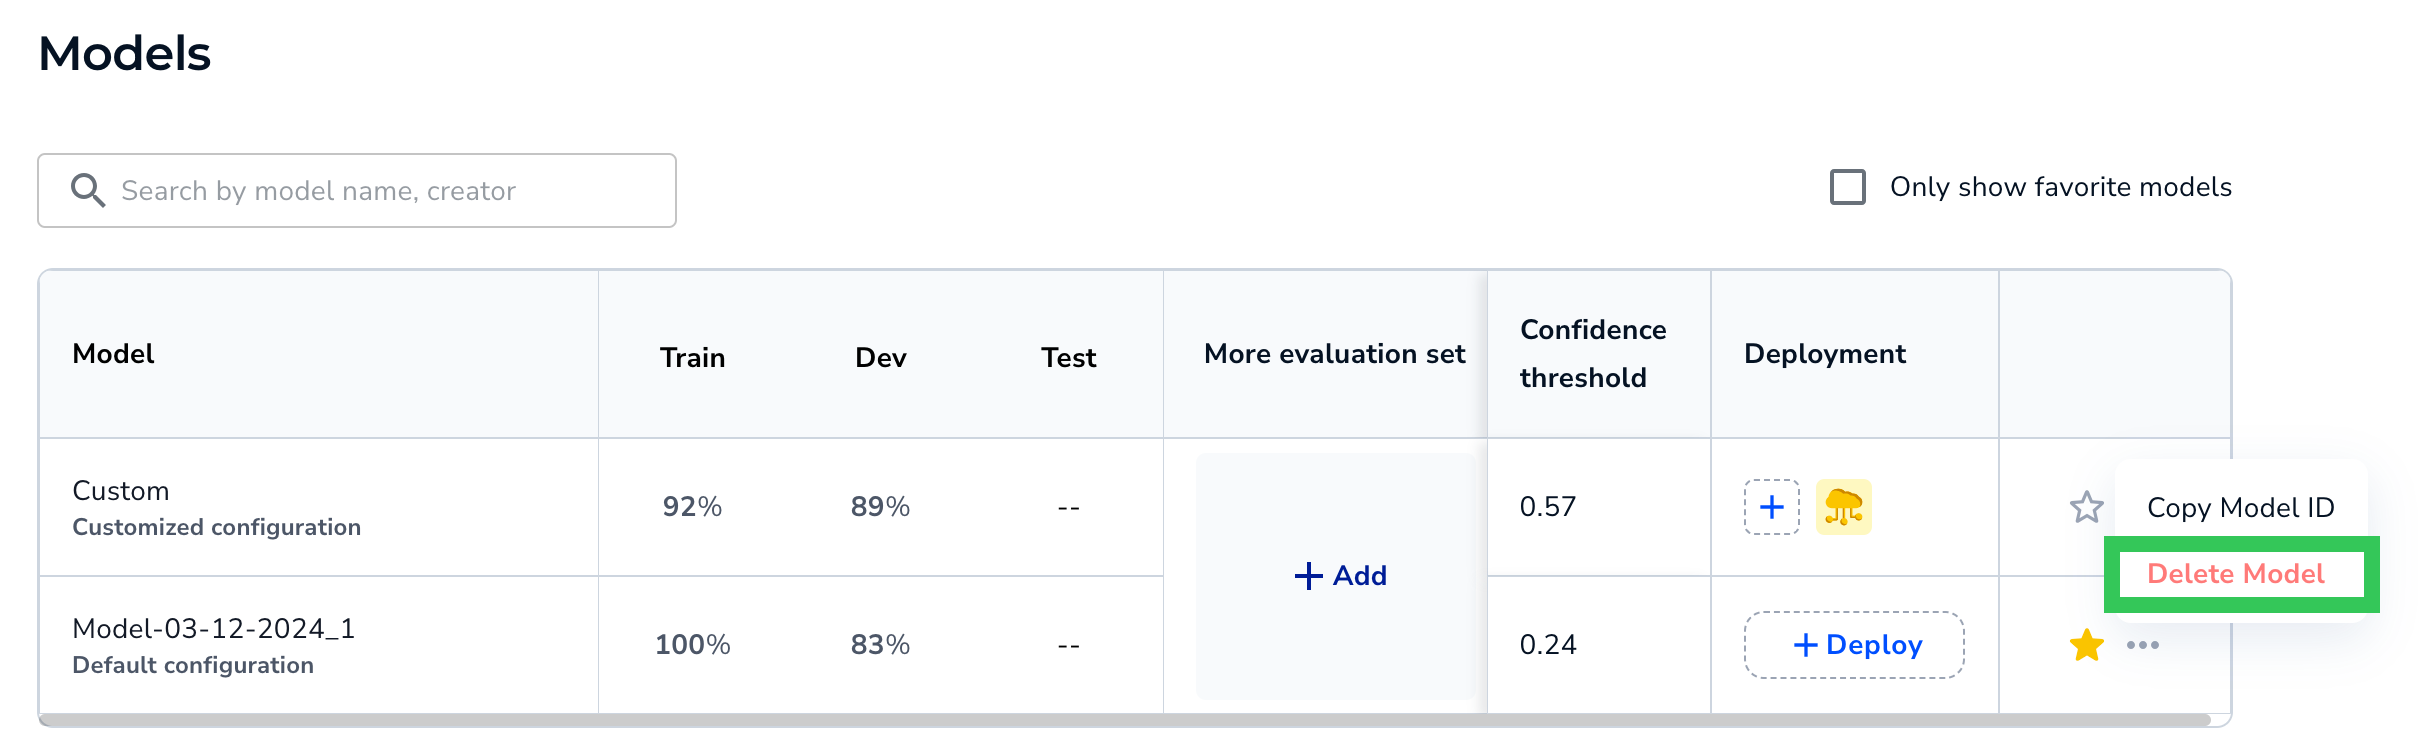 Delete a Model
Compare Two Models
The Models page is a great way to get a high-level view of how different models performed on multiple datasets at once. However, if you'd like to see more details about how two specific models compare, use the Compare Models tool. The Compare Models tool is a great way to evaluate performance on multiple iterations of the model. It can help you identify if you need to improve your labels, datasets, and hyperparameters.
When you run the Compare Models tool, you set a baseline model and a candidate model. LandingLens then shows you if the candidate model performed better or worse for each prediction outcome (False Positive, False Negative, Correct, etc). You can even see a side-by-side comparison of how the baseline and candidate models performed on each image in the dataset.
 Model Comparison
Note:
Comparisons are generated on-demand, and are not saved.
Run the Compare Models Tool
To compare two models:
- Open the project to the Models tab.
- Hover over the cell for one of the models you want to compare and click the Compare icon that appears. This model will be the baseline in the comparison. In other words, the second model will be compared as either better or worse than this model.
- Click the cell for the second model you want to compare. This model will be the candidate in the comparison. In other words, this model will be compared as either better or worse than the first model.Note:Want to switch the baseline and candidate models? Click the Switch icon.
- Click Compare.
 Select the Models to Compare
 - The Compare Models window opens and shows the difference in performance between the two models.
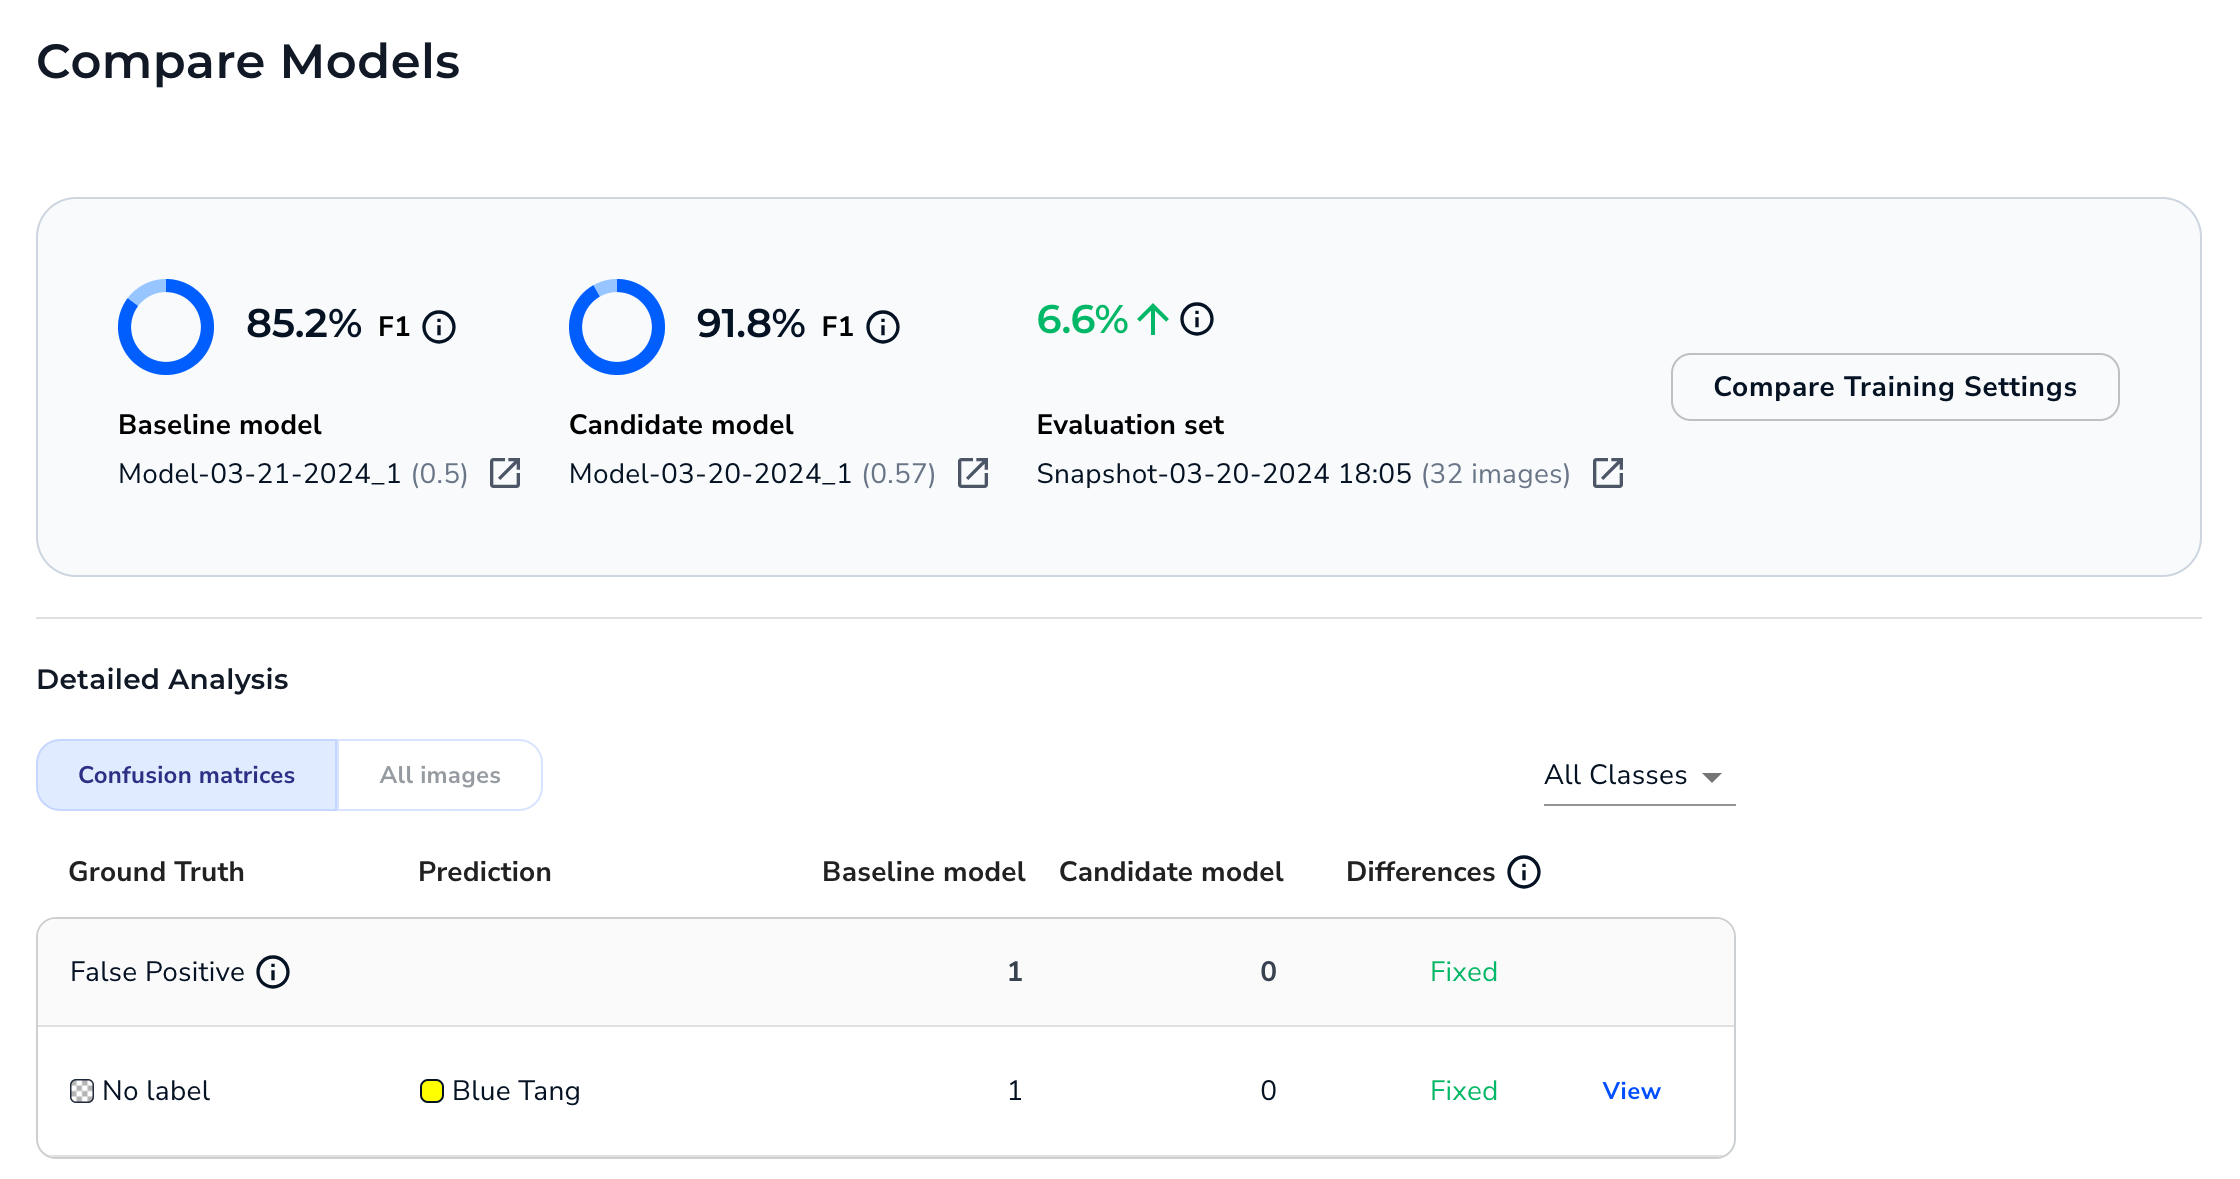 Model Comparison


Model Performance
The top of the Compare Models window show scores for the baseline and candidate models. Click the link below a model to see the Training Information for that model.
The score type depend on the project type:
- Object Detection: F1 score
- Segmentation: IOU (Intersection over Union)
- Classification: F1 score
 Model Scores for an Object Detection Project
The window also shows the difference in score between the two models. Click the link below the score difference to see the dataset snapshot that the models were evaluated on.
 Difference Between Model Scores in an Object Detection Project
Compare Training Settings
In the Compare Models window, click Compare Training Settings.
 Compare Training Settings
This opens a table with a side-by-side comparison of the settings used to train each models. Differences in settings are highlighted.
 Compare the Training Settings for the Baseline and Candidate Models
Confusion Matrices
By default, the Compare Models window compares the two models using a confusion matrix for each prediction outcome. A confusion matrix is a table that visualizes the performance of an algorithm—in this case, the two computer vision models that you're comparing.
First, the data is grouped into tables (confusion matrices) based on prediction outcome. The prediction outcomes include:
- False Positive: The model predicted that an object of interest was present, but the model was incorrect. This is only applicable to Object Detection and Segmentation projects.
- False Negative: The model predicted that an object of interest was not present, but the model was incorrect. This is only applicable to Object Detection and Segmentation projects.
- Misclassified: The model correctly predicted that an object of interest was present, but it predicted the wrong class.
- Correct: The model’s prediction was correct. This includes True Positives and True Negatives.
 Example of Confusion Matrices for Object Detection Models
Ground Truth and Predictions
Each confusion matrix focuses on a specific prediction outcome (False Positive, False Negative, etc). Each row in a matrix represents each instance of the outcome that occurred in both the baseline and candidate models. The first column is the Ground truth, which is the labeled class on the image in the dataset. The second column is the Prediction, which is a class that either the baseline or candidate model predicted incorrectly.
.png) Ground Truth vs. Predictions
Ground Truth vs. PredictionsNote:
Each confusion matrix only has rows for the actual ground truth / prediction pairings that occurred. It doesn't have a row for every possible ground truth / prediction pairing that could have occurred, because then the instance count for both the baseline and candidate models would be 0.
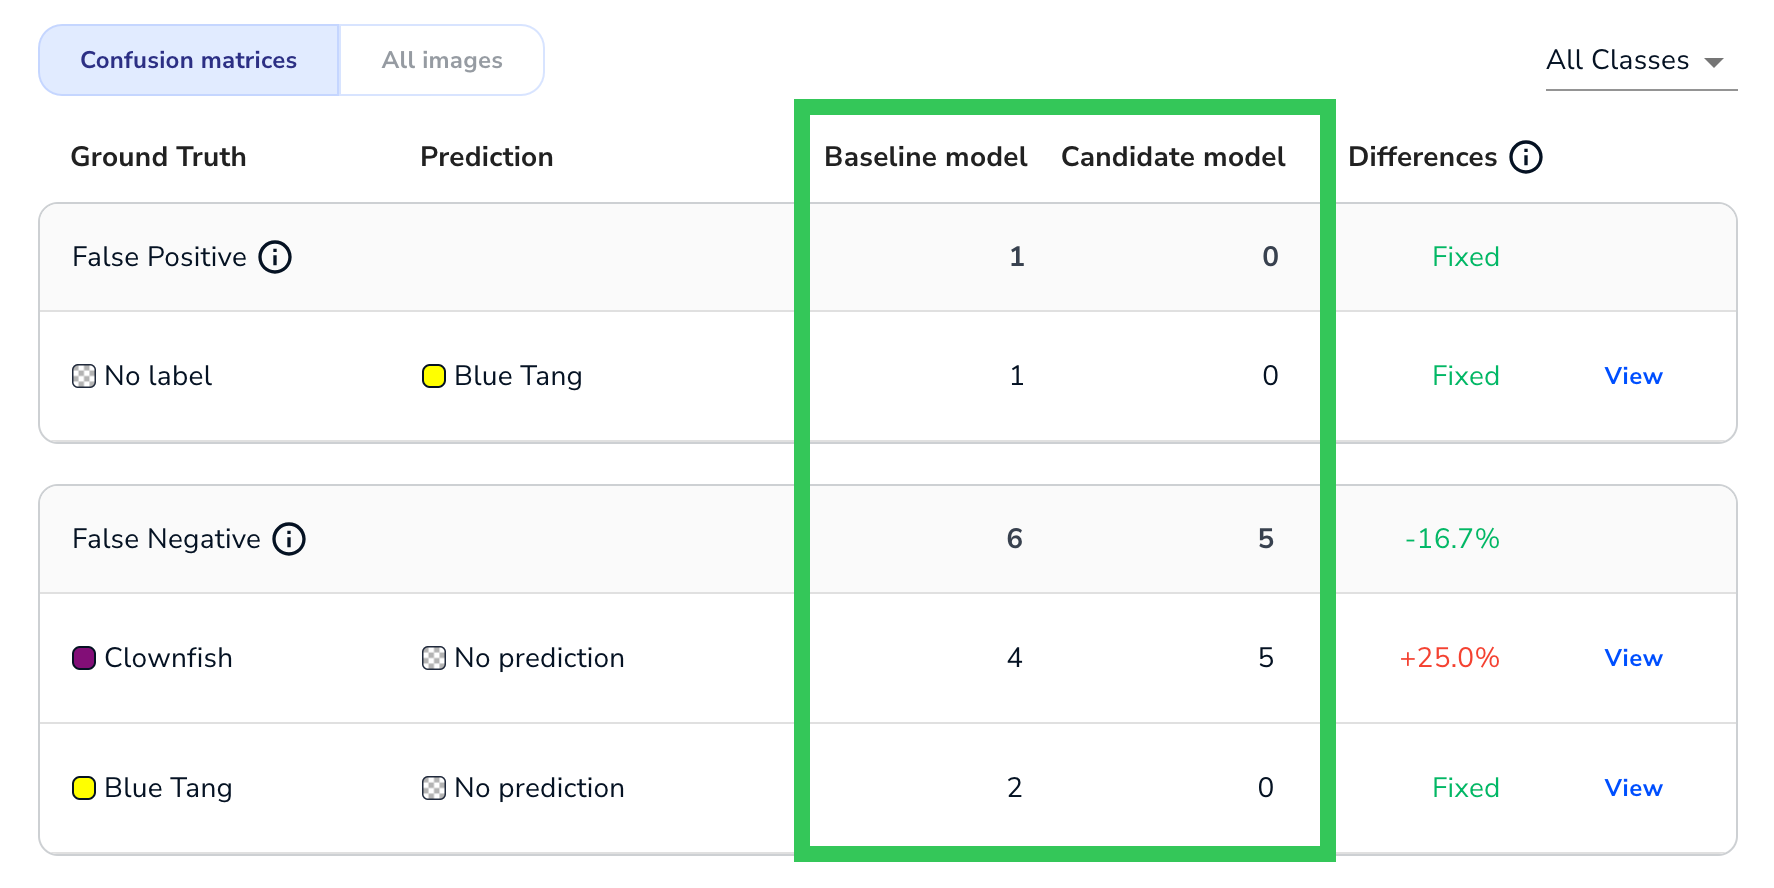
Baseline, Candidate, and Differences
For each Ground Truth / Prediction pairing in a confusion matrix, LandingLens show how each model performed and how the candidate model either improved or got worse. This information is displayed in the Baseline, Candidate, and Differences columns.
The Baseline and Candidate column depend on the project type:
- Object Detection and Classification: The number of times that the model made that prediction for the specific Ground Truth / Prediction pairing.
 Number of Times Each Model Made the Prediction (Object Detection)
 - Segmentation: The number of pixelsfor which the model made that prediction for the specific Ground Truth / Prediction pairing.
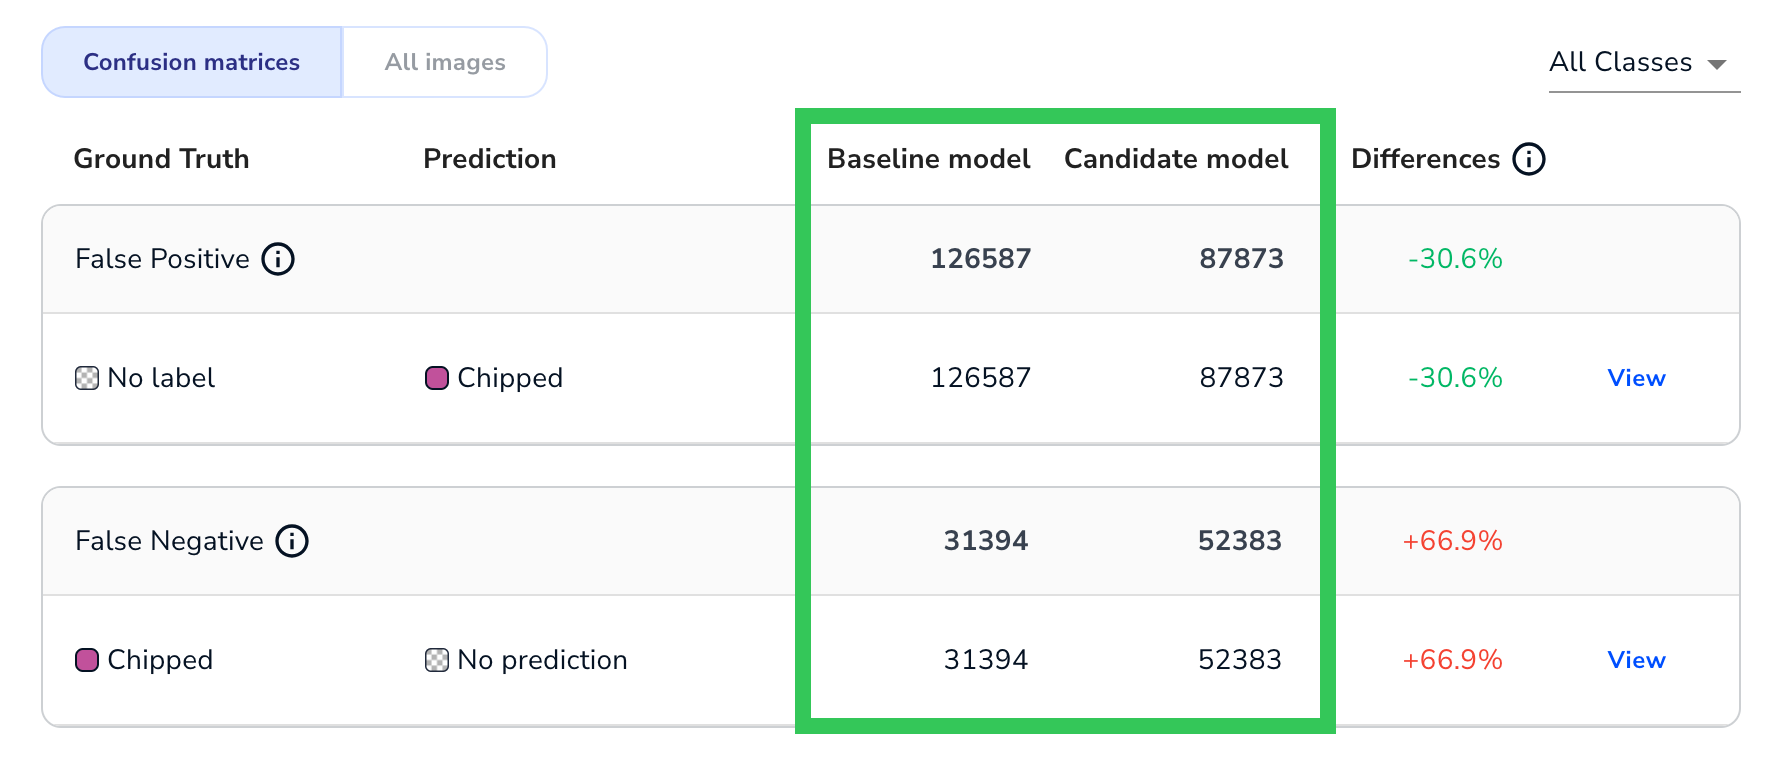 Number of Pixels for Which the Model Made the Prediction (Segmentation)


The Differences column shows if the candidate model improved or got worse, when compared to the baseline model. The following table describes the possible outcomes in the Differences column.
| Outcome | Description |
|---|---|
| Green | The candidate performed better than the baseline. |
| Red | The candidate performed worse than the baseline. |
| Fixed | The baseline made errors, but the candidate did not. In other words, the candidate "fixed" all of the issues that the baseline had. |
| New Error | The baseline did not make errors, but the candidate did. In other words, the candidate introduced a "new error type" that wasn't present in the baseline. |
| Percentage | Both the baseline and candidate made errors. In this case, the Difference is calculated as: ((candidate - baseline) / baseline) * 100 |
| -- | This is only applicable to the Correct category. Either the baseline or candidate made mistakes, but the other model did not. |
For example, this is how the Differences column looks in an Object Detection project:
 The Differences in an Object Detection Project
View Images for a Confusion Matrix
Click View next to the Differences column of a confusion matrix (or simply click the row) to see the images that are included in this Ground Truth / Prediction pairing. Click the images to see a larger version of the images.
 View Images from a Confusion Matrix
View Images - Overlays
Images have overlays that show the relevant predictions for the confusion matrix. If the model missed an object of interest, the overlay is white. Otherwise, the overlay colors correlate to the class colors.
The overlay formatting is different for each project type, as described in the following sections.
View Images - Object Detection
Each relevant prediction displays as an overlay. The number of predictions displays in the bottom right corner of the image. Some confusion matrices have additional overlays, as described in the following table.
| Confusion Matrix | Overlay Description | Example |
|---|---|---|
| False Positive | The overlay includes the confidence score of the prediction. |  |
| False Negative | The overlay includes "Missed", because the model predicted that an object of interest was not present, but the model was incorrect. |  |
| Correct | The overlay includes the confidence score of the prediction. |  |
View Images - Segmentation
There are overlays over the regions that the model predicted incorrectly. It is important to note that the overlay does not show the full prediction, but only the part that was wrong for this this specific Ground Truth / Prediction pairing.
The overlay format is slightly different for each confusion matrix, as described in the following table.
| Confusion Matrix | Overlay Description | Example |
|---|---|---|
| False Positive | There is a purple striped overlay over the regions that the model predicted incorrectly. |  |
| False Negative | There is a white striped overlay over the regions that the model "missed". |  |
| Correct | There is a purple striped overlay over the regions that the model predicted correctly. |  |
View Images - Classification
Because classes are assigned to an entire image in Classification projects, it doesn't make sense to show the predictions as an overlay. Therefore, LandingLens shows the images and lists the ground truth and predictions next to the images.
.png) Images in a Misclassified Confusion Matrix for a Classification Project
Images in a Misclassified Confusion Matrix for a Classification ProjectCompare All Images
Click All Images to see a visual comparison of all images. This shows three versions of each image in the evaluation dataset:
- Ground truth: The original image with the ground truth (labels) that you added.
- Baseline model: The predictions of the candidate model.
- Candidate model: The predictions of the candidate model. LandingLens highlights an image if the candidate model performed better or worse than the baseline for that specific image.
 Compare All Images
Click a set of images to see more information about those images.
 More Information for the Images
Was this article helpful?