Manage Images
- 20 Dec 2022
- 4 Minutes to read
- Print
- DarkLight
- PDF
Manage Images
- Updated on 20 Dec 2022
- 4 Minutes to read
- Print
- DarkLight
- PDF
Article Summary
Share feedback
Thanks for sharing your feedback!
Supported Image Files and File Types
- BMP
- JPEG
- PNG (recommended)
- Pascal VOC (available for Object Detection)
Note:
Pascal VOC is a file type for images labeled in LandingLens or an external application. This file format includes the label details and tells the platform where a label is on the associated image.
Images Are Resized During Model Training
By default, LandingLens automatically resizes all images to 512x512 during Model Training. This auto-resize does not affect the images on the platform. The platform automatically resizes images to make the training faster and more effective. If you want images to be a specific size for Model Training, resizing your images before uploading them to your Project is recommended.
Maximum Image Size for Model Training
Each Project Type has a maximum image size for Model training:
- Classification: 1600x1600px
- Object Detection: 1600x1600px
- Segmentation: 800x800px
- Anomaly Detection: 512x512px
The maximum image size is measured by the area, not width and height. For example, the maximum image size for Segmentation is 800x800px. To get the area, multiply 800 times 800, so the equation looks like this: 800 x 800 = 640,000. If you want to resize a Segmentation image, the area cannot exceed 640,000 pixels.
- A resize of 1000x600px will work because the area of this resize is 600,000 pixels, which is less than 640,000 pixels.
- A resize of 800x801px will not work because the area of this resize is 640,800 pixels, which is greater than 640,000 pixels.
The table below shows the maximum area (in pixels) for each Project Type:
| Project Type | Maximum Image Size (in pixels) | Maximum Area (in pixels) |
|---|---|---|
| Classification | 1600x1600 | 2,560,000 |
| Object Detection | 1600x1600 | 2,560,000 |
| Segmentation | 800x800 | 640,000 |
| Anomaly Detection | 512x512 | 262,144 |
Upload Images to Projects
After you've created your Project, you can upload images to it.
Note:
You must upload and label at least 10 images before training a Model.
To upload images to your Project:
- Open the Project you want to upload images to.
- On the Data page, click Upload.
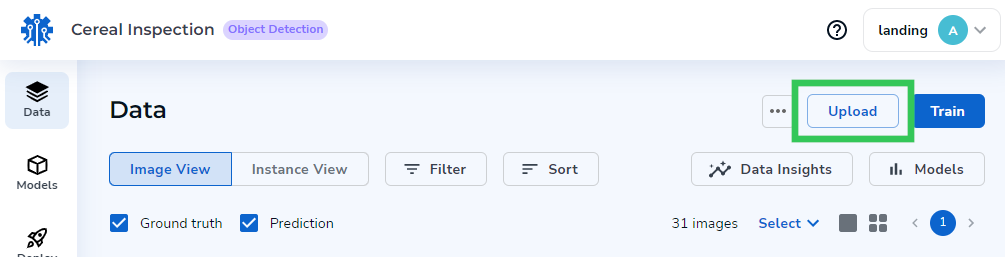 Upload Button
 - Perform one of the following options to upload images:
- Drag the images you want to upload to the upload box.
- Click the upload box to search for and select the images you want to upload.
- Click Turn on Webcam to upload images taken by your webcam.
- You may need to allow LandingLens to access your webcam.
.png) Allow Access to Your Webcam
Allow Access to Your Webcam - Click the Capture button to take a picture using your webcam.
 Capture Button
- You may need to allow LandingLens to access your webcam.
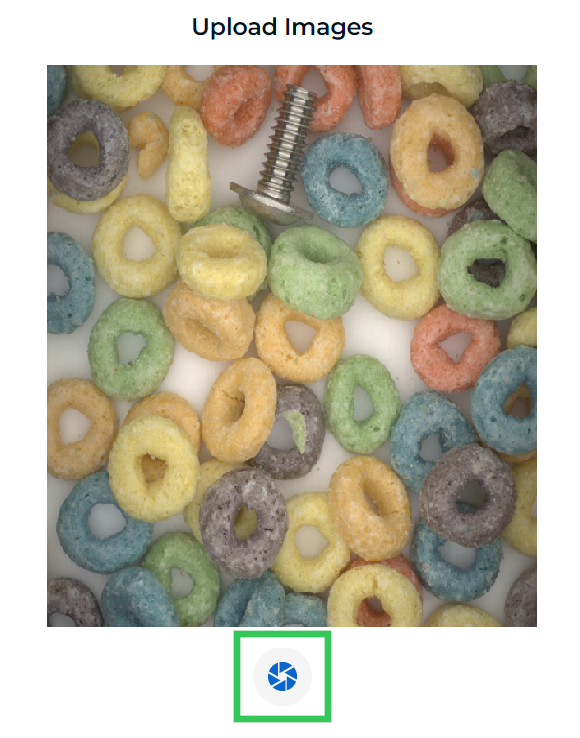
- A preview of your images displays. To confirm your upload, click the Upload button.
.png) Upload Images
Upload Images - Your images are uploaded to your Project. You can close the upload window.

.png)

.png)
Upload Images After Model Training
LandingLens will automatically generate Predictions on images uploaded after Model Training. You will be able to see these Predictions in the Data Browser. This feature will save you time from needing to retrain your Model after you upload new images to your dataset.
In the unlikely event that the Model is unable to predict an image successfully, the status Unpredicted will display on the image.
.png) "Unpredicted" Image Status
"Unpredicted" Image Status What if an image does not display any Predictions and has the status "Unpredicted"? If this occurs, the Model did not find anything to detect.
Notes:
- If you have not already trained your Model, or your Model did not successfully complete its training, the Model will not make any Predictions.
- It is recommended to label uploaded images, even if the Model's Predictions are accurate.
Limitations for Image Uploads
- LandingLens does not have any size limitations for image uploads.
- You can upload as many images as you need to your Project.
Number of Images Required for a Project
Since every Project is different, there is no recommended set number. The number of required images for your Project generally depends on these factors:
- How elaborate is the object to identify is
- How many types of objects are there
- How the object looks
For example, a washer missing a tooth would require fewer images than a printed circuit board with several intricate parts.
Upload Pre-Labeled Images
You can upload images that have been labeled in an external application. These pre-labeled images must be in Pascal VOC file format. Pascal VOC (Visual Object Classes) is a file format that includes the label details of its paired image. It essentially tells the platform where a label is on the associated image.
Before you upload pre-labeled images, you must unzip the file; LandingLens will not accept zipped files.
Note:
The Pascal VOC file type is only available for Object Detection Projects.
 Pascal VOC Files Must Be Unzipped
LandingLens will detect the Pascal VOC file type and display it on upload.
.png) Pascal VOC Images
Pascal VOC Images The pre-labeled images will display in the Data Browser.
 Pre-Labeled Images Display in the Data Browser
 Upload Folders
LandingLens simplifies folder structures and flattens all files. Let's say you have one folder (Folder A) and two subfolders (Folder B and C). If you upload Folder A, LandingLens will upload all images from Folders A, B, and C, as if they came from the same folder.
.png) LandingLens Flattens Files
LandingLens Flattens Files However, if you upload Classified Media to a Classification Project, LandingLens will ignore any subfolders. Referring to the example above, if you upload Folder A, only the images in Folder A will be uploaded; the images in Folders B and C will not be uploaded.
 LandingLens Ignores Subfolders for Classified Media Uploads
Delete Images from a Project
Let's say you accidentally uploaded some images to your Project that you do not want to keep. You can remove those images from your Project. To do this:
- Select the images you want to remove. (Hover over the image and click the checkbox in the upper-left corner.)
- Click Options in the action bar near the bottom of the screen and select Remove from Dataset. (You may need to scroll to see this option.) The selected images are deleted from your Project.
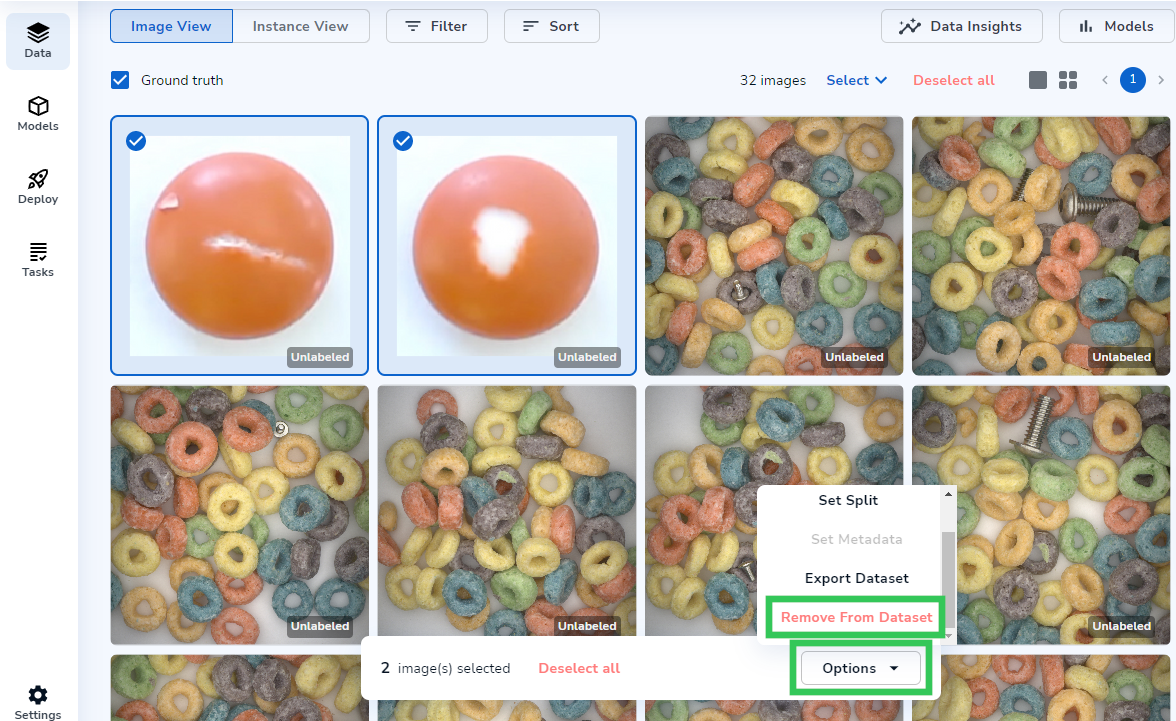 Remove from Dataset


Was this article helpful?