Train Models
- 07 Apr 2023
- 15 Minutes to read
- Print
- DarkLight
- PDF
Train Models
- Updated on 07 Apr 2023
- 15 Minutes to read
- Print
- DarkLight
- PDF
Article Summary
Share feedback
Thanks for sharing your feedback!
Overview
LandingLens offers two Model Training options:
- Fast Training: This is the default option. LandingLens will automatically fine-tune its settings to optimize Model Training speed.
- Custom Training: This is an advanced option recommended for users who are knowledgeable in machine learning. Custom Training allows these users to have more granular control over pre-processing transforms and manual hyperparameter tuning.
Model Training Process
Models go through a series of steps when they train. This section describes those steps at a high level.
- Provisioning GPU. LandingLens will warm up a virtual computer in the cloud that includes a graphics processing unit (GPU). This virtual computer is where the Model Training occurs.
.png) Step 1: Provisioning the GPU
Step 1: Provisioning the GPU - Configuring Your Model. The platform will send the Model's data and details to the virtual computer. This information will tell the Model how to train itself.
.png) Step 2: Configuring Your Model
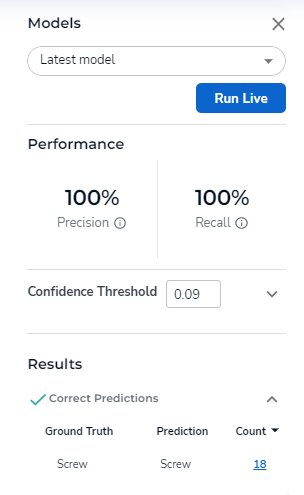
Step 2: Configuring Your Model - Training & Learning. An error curve will display. This graph will show how well the Model is training. If the line drops when it trains, the Model is making fewer errors and learning to be more accurate. The Model will test its accuracy by comparing its Predictions to your Ground Truth.
.png) Step 3: Training & Learning
Step 3: Training & Learning - Calculating Model Performance. The platform will load the metrics and show you how well the Model performed. Go here for more information on these metrics.
 Step 4: Model Performance
.png)
.png)
.png)

Train Models
- Open the Project you want to train to the Data Browser.
- Choose one of these options depending on how you want to train the Model:
- Fast Training: Click the Train button.
.png) Use the "Train" Button for Fast Train
Use the "Train" Button for Fast Train - Custom Training: Click the downward-facing arrow and click Train with Custom Options. Then configure the settings. (This option is intended for users who are knowledgeable in machine learning.)
.png) Use the "Train with Custom Options" for Custom Training
Use the "Train with Custom Options" for Custom Training
- Fast Training: Click the Train button.
.png)
.png)
Custom Model Settings
This section describes the settings you can configure to train a Custom Model.
Data Transform
Data Transform allows you to resize or crop all the images in your dataset. This is an important feature because all training images need to be a standard input size for your Model. Any Transforms applied here will be applied to the data you provide to your Model for training and inference. It's important to be sure that the objects/regions you are trying to detect are clearly visible after applying these Transforms; otherwise, you can risk training poorly performing Models.
If you add a Data Transform, you must add a Resize Transform first. This ensures that all data is consistently sized before cropping. Furthermore, resizing your data first prevents you from accidentally cropping outside the image boundaries of small images.
To add Data Transforms:
- Click Add Transform.
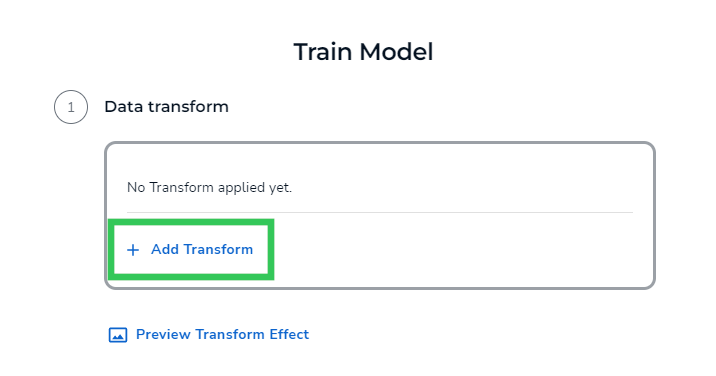 Add Transform
 - Click Resize or Crop accordingly.
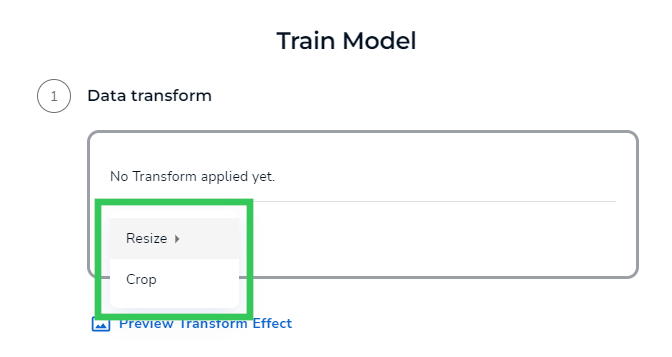 Resize or Crop
 - Configure the settings.
- Click Add to Pipeline to apply the change to all images in your dataset.
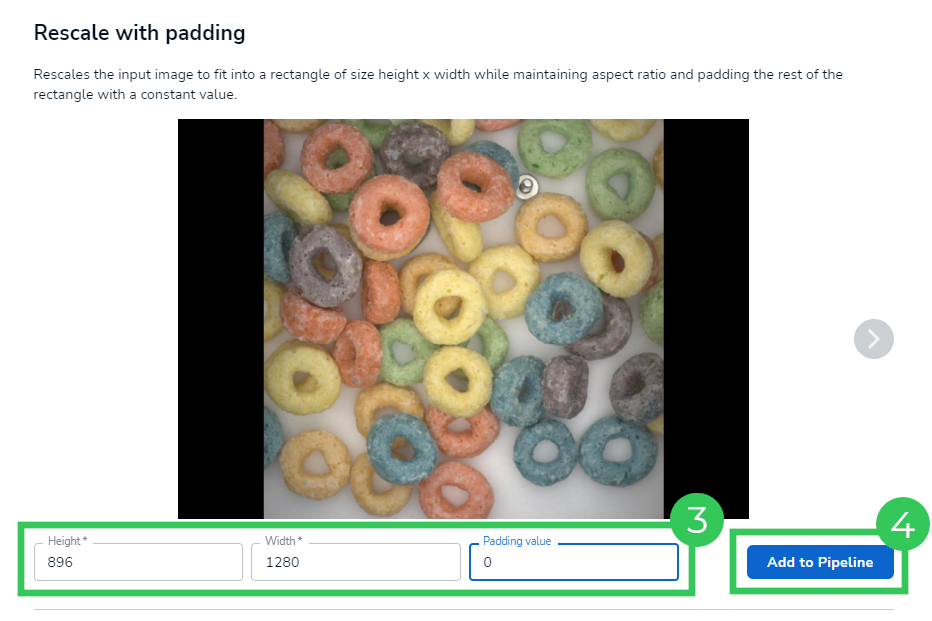 Configure Settings and Add to Pipeline


Resize
You can resize all images in your dataset with the Resize setting. Here are a couple of examples of when you may want to do this:
- Say the images in your dataset are over 6.75 MB and larger than 1500 x 1500 pixels. These large images can decrease the Model Training and inference speed. To decrease latency, you can reduce the size of the image.
- If you use Fast Training, LandingLens will automatically resize images to optimize Model Training time by default. If you have large images that include small objects to detect, these objects can be lost due to the automatic resize. You can customize the size of your images with this setting. (Go here to learn more about automatic resizing during Model Training.)
There are two types of Resize settings:
- Manual Resize: Enter the dimensions you want your images to be when you train the Model. For example, if the original images are 1200x800 and the Resize is 512x512, all images will be resized into square images, even though the original images were in a 4:3 ratio. If you want to preserve the original aspect ratio, use Rescale with Padding.
.png) Manual Resize
Manual Resize - Rescale with Padding: Enter the dimensions you want your images to be when you train the Model. The image will be rescaled to that size, padding will fill the sides of the image, and the original aspect ratio will be kept. For example, if the original images are 1200x800 and you rescale to 512x512, the actual image will be 512x834 with the remaining 128 pixels padded on either side.Note:Rescale with Padding is set by default. You can adjust this setting as needed.
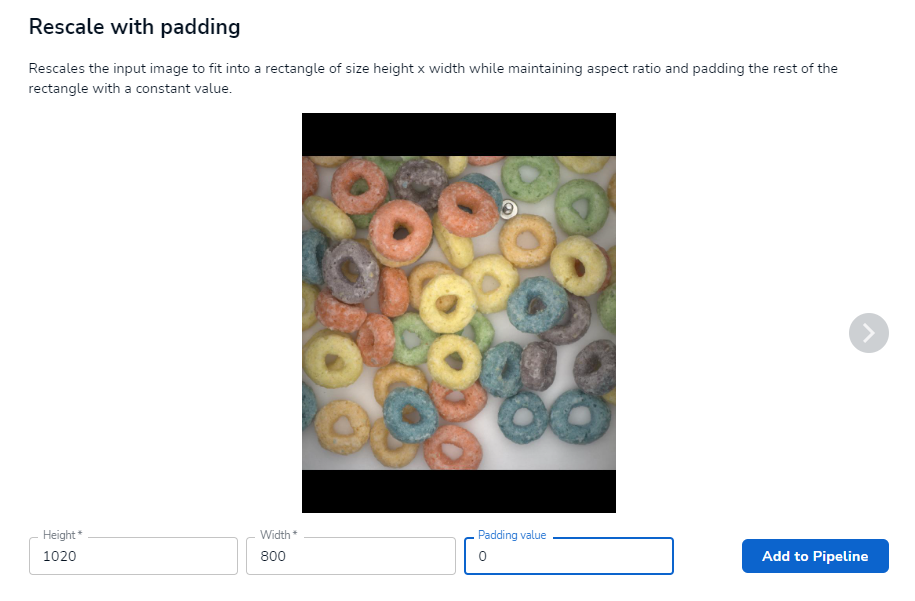 Rescale with Padding
.png)

Crop
You can manually crop all images in your dataset. To do this, click and drag the sides of the box to create the crop you want to use for that image and click Add to Pipeline. Then use the left and right arrows to preview the crop of the other images in your dataset.
Tip:
You can click the center of the crop box and drag it to the area where you want to start the crop.
.gif) Crop Images
Crop ImagesData Augmentation
The Data Augmentation setting offers several pre-processing modifications that allow you to update all images in your dataset quickly. Here's how it works. First, you select a modification. Then enter the probability that the modification will take effect. For example, you can make it so there's a 50% chance that images will be rotated vertically.
Here are some benefits of adding Data Augmentations:
- You can reduce the time spent collecting data by augmenting images to "create" images you would have otherwise had to capture.
- Augmentations can create variations of your images so your Model can be more robust when you deploy it.
- It reduces the chance of overfitting because the Model will be shown random versions of images during each Epoch cycle to prevent Models from simply "memorizing" the data.
This section describes the types of Data Augmentation LandingLens offers.
.png) Data Augmentation Settings
Data Augmentation SettingsRandom Brightness
Apply Random Brightness for a chance that the images in your dataset will randomly brighten.
For example, say your camera took several images at night, and the objects in the image are dark. You want your Model also to learn how images will look if they are taken during the day. You may be asking yourself why this is important. When you deploy or train a Model with poorly lit images, it can perform poorly because when the lighting changes look "different" to the Model, it may not recognize the area to detect. In this case, you can use the Random Brightness modification to improve the lighting.
This modification offers many settings, as described in the table below.
 Random Brightness
 | # | Setting | Description |
|---|---|---|
| 1 | RandomBrightness Range | Images have a chance to be brightened to any value in the range specified here. |
| 2 | Probability | The likelihood that images will have random brightness applied. |
| 3 | Random Brightness | Use this setting to preview how images will look in the selected value. |
| 4 | Set as Lower Limit | Set a value in the RandomBrightness modification to preview how images will look at that brightness level. Then click Set as Lower Limit to choose the lowest brightness level that you want images to display in. The value in the RandomBrightness setting (#3) will be set as the lowest value in the RandomBrightness Range (#1). |
| 5 | Set as Upper Limit | Set a value in the RandomBrightness modification to preview how images will look at that brightness level. Then click Set as Upper Limit to choose the highest brightness level that you want images to display in. The value in the RandomBrightness setting (#3) will be set as the highest value in the RandomBrightness Range (#1). |
Blur / Motion Blur / Gaussian Blur
Apply one of the blur modifications for a chance that the images in your dataset will randomly blur. LandingLens offers these types of blurs:
- Blur: Makes the entire image look out of focus. This is a heavy blur.
- Motion Blur: Makes the entire image look like it's in motion.
- Gaussian Blur: Makes the entire image look out of focus. This is a natural blur.
.png)
.png)
This modification offers many settings, as described in the table below.
 Blur
Blur | # | Setting | Description |
|---|---|---|
| 1 | Blur Range / MotionBlur Range / Gaussian Blur Range | Images have a chance to be blurred to any value in the range specified here. |
| 2 | Probability | The likelihood that images will have random blur applied. |
| 3 | Blur / Motion Blur / Gaussian Blur | Use this setting to see how the images will look in the selected value. |
| 4 | Set as Lower Limit | Set a value in a blur modification to preview how images will look at that blur level. Then click Set as Lower Limit to choose the lowest blur level that you want images to display in. The value in the Blur / Motion Blur / Gaussian Blur setting (#3) will be set as the lowest value in the Blur Range / Motion Blur Range / Gaussian Blur Range (#1). |
| 5 | Set as Upper Limit | Set a value in a blur modification to preview how images will look at that blur level. Then click Set as Upper Limit to choose the highest blur level that you want images to display in. The value in the Blur / Motion Blur / Gaussian Blur setting (#3) will be set as the highest value in the Blur Range / Motion Blur Range / Gaussian Blur Range (#1). |
Hue Saturation Value
Apply Hue Saturation Value for a chance that the color intensity of the images will change.
For example, some objects come in multiple colors, like a car. You may want to change the hue (color of the image), so the Model trains on these various colors.
Note:
Saturation is how "pure" the hue is. A saturation of 0 is black and white.
This modification offers many settings, as described in the table below.
 Hue Saturation Value
 | # | Setting | Description |
|---|---|---|
| 1 | Hue / Sat / Val Shift Range | Images have a chance to change the Hue Saturation Value to any value in the range specified here. |
| 2 | Probability | The likelihood that images will have random Hue Saturation Value applied. |
| 3 | HueSaturationValue | Use this setting to see how images will look in the selected value. |
| 4 | Set as Lower Limit | Set a value in the HueSatuationValue modification to preview how images will look at that HSV value. Then click Set as Lower Limit to choose the lowest HSV level that you want images to display in. The value in the HueSaturationValue setting (#3) will be set as the lowest value in the Hue/Sat/Val Shift Range (#1). |
| 5 | Set as Upper Limit | Set a value in the HueSaturationValue modification to preview how images will look at that HSV value. Then click Set as Upper Limit to choose the highest HSV level that you want images to display in. The value in the HueSaturationValue setting (#3) will be set as the highest value in the Hue/Sat/Val Shift Range (#1). |
Random Contrast
Apply Random Contrast for a chance that the tone of the images in your dataset will randomly change. Random Contrast helps to simulate different camera settings or environments that a deployed Model may encounter.
- A low-contrast image will look washed out or slightly dimmed.
- A high-contrast image will look somewhat overexposed, and the colors will merge into each other.
This modification offers many settings, as described in the table below.
 Random Contrast
 | # | Setting | Description |
|---|---|---|
| 1 | RandomContrast Range | Images have a chance to have added contrast to any value in the range specified here. |
| 2 | Probability | The likelihood that images will have random contrast applied. |
| 3 | RandomContrast | Use this setting to preview how images will look in the selected value. |
| 4 | Set as Lower Limit | Set a value in the RandomContrast modification to preview how images will look at that contrast level. Then select Set as Lower Limit to choose the lowest contrast level that you want to images to display in. The value in the RandomContrast setting (#3) will be set as the lowest value in the RandomContrast Range (#1). |
| 5 | Set as Upper Limit | Set a value in the RandomContrast modification to preview how images will look at that contrast level. Then select Set as Upper Limit to choose the highest contrast level that you want images to display in. The value in the RandomContrast setting (#3) will be set as the highest value in the RandomContrast Range (#1). |
Horizontal Flip / Vertical Flip
- Apply Horizontal Flip for a chance that images in your dataset will rotate 180 degrees left or right. This is useful for Models to "learn" what objects would look like if they are mirrored.Note:Horizontal Flip is set by default. You can adjust this setting as needed.
- Apply Vertical Flip for a chance that images in your dataset will rotate 180 degrees up or down. This is useful for Models to "learn" what objects would look like if they were upside-down.
These modifications offer the Probability setting. This setting indicates the likelihood that images will randomly flip.
.png) Probability of a Horizontal Flip
Probability of a Horizontal Flip RandAugment
Apply RandAugment for a chance of any Augmentation to be applied to the images in your dataset at random.
Note:
RandAugment is set by default. You can adjust this setting as needed.
This modification offers many settings, as described in the table below.
 RandAugment
| # | Setting | Description |
|---|---|---|
| 1 | Number Transforms | The number of Transforms and Augmentations you want to be added to images. |
| 2 | Probability | The likelihood that images will have a random augmentation applied. |
| 3 | Magnitude | How strong the applied Transform will be, ranked 1 to 10 with 1 being weak and 10 being strong. |
Random Rotate
Apply Random Rotate for a chance that images in your dataset will randomly rotate.
This modification offers many settings, as described in the table below.
 Random Rotate
 | # | Setting | Description |
|---|---|---|
| 1 | Rotate Range | Images have a chance to rotate to any degree in the range specified here. |
| 2 | Probability | The likelihood that images will randomly rotate. |
| 3 | Interpolation | Use this setting to resize images. |
| 4 | Border Mode | Use this setting to create a border around the image, like a photo frame. |
| 5 | Rotate | Use this setting to preview how images will look in the selected value. |
| 6 | Set as Lower Limit | Set a value in the Rotate modification to preview how images will look at that rotate level. Then click Set as Lower Limit to choose the lowest rotation level that you want images to display in. The value in the Rotate setting (#3) will be set as the lowest value in the Rotate Range (#1). |
| 7 | Set as Upper Limit | Set a value in the Rotate modification to preview how images will look at that rotate level. Then click Set as Upper Limit to choose the highest rotation level that you want images to display in. The value in the Rotate setting (#3) will be set as the lowest value in the Rotate Range (#1). |
Preview Effects
After configuring an advanced setting, you can preview how the images will look. To do this, click Preview Transform Effect or Preview Augmentation Effect accordingly.
 Preview Effects Buttons
.png) Preview of the Effects Applies
Preview of the Effects Applies Note:
When you set Data Augmentations, you provide a range of how those Data Augmentations affect images. You can see other possibilities by clicking Reapply.
Hyperparameter
When a Model trains, it goes through an extensive process in the background. If you want to have more granular control over how your Model trains, you can configure the Hyperparameters. A Hyperparameter is a setting used to control the speed and quality of the learning process.
Here are some important notes to keep in mind:
- The Hyperparameter settings are intended for users who are familiar with Machine Learning. If you are unfamiliar with Machine Learning, it is recommended to use the default settings.
- Hyperparameters should only be adjusted to be data-driven.
- Repeatedly training a Model with different Hyperparameters (called "Hyperparameter Sweep") is NOT recommended as this can be expensive.
Hyperparameters have a couple of settings, as described in the table below.
 Hyperparameter
| Setting | Description |
|---|---|
| Epoch | When your Model trains, it works through your dataset multiple times. The completion of one cycle is called an Epoch. Enter the number of cycles you want the Model to perform in this field. |
| Model Size | The size of the Model's capacity. Model capacity refers to the Model's ability to learn complex patterns in data.
|
View Trained Models Reports
After you train a Model, LandingLens creates a report for that Model. To view these reports, click the vertical ellipsis icon (⋮) in the Models sidebar.
 Vertical Ellipsis Icon
The report is divided into different sections, as described in the table below.
.png) Trained Model Report
Trained Model Report
| # | Section | Description |
|---|---|---|
| 1 | Training Info |
|
| 2 | Loss Curve | Data is sent to your Model when it trains. While the Model trains, LandingLens displays a graph that shows how well the Model is training. This graph is similar, except that it also includes a timeline that shows how long the Model took to train. Note: When you train a Model, a virtual computer in the cloud warms up. Because of this step, the starting time does not start at 0 seconds. Instead, the graph starts after the amount of time it took to acquire the virtual computer. |
| 3 | Configuration | This information provides more details on your Model training. For example, you can see how many Epoch cycles your Model went through. |
| 4 | Logs | This information is helpful for troubleshooting. If you experienced any issues during Model Training, you can provide these logs to a Landing AI associate. |
Custom Train FAQ
How does Fast Train work?
LandingLens fine-tunes its settings to optimize Model Training speed.
When should I use Advanced Train?
If the performance results of your Model are unsatisfactory after a Fast Train, switch to Advanced Train.
Note:
Advanced Train is intended for users who are knowledgeable in machine learning.
I'm unfamiliar with machine learning. Can I use Advanced Train?
We recommend using Fast Training so that LandingLens can fine-tune your Model settings for you.
I applied Custom Train settings. Will these settings be saved moving forward?
No. Since each Model is unique, the Custom Train settings are only applied to the opened Model for that training instance. The settings are reset after each train.

.png)

Was this article helpful?